
If you use a grinder regularly, you know how quickly it can get gunked up. A dirty grinder doesn’t just slow you down—it can also affect the taste and quality of what you’re grinding.
But cleaning your grinder doesn’t have to be a hassle. You’ll discover simple, step-by-step methods to get your grinder spotless and working like new again. Keep reading, and you’ll never struggle with a clogged or sticky grinder again.
Credit: blimburnseeds.com
Why Cleaning Matters
Cleaning your grinderis essential for better taste. Old coffee oils and grounds can make your brew bitter and stale. Removing these residues helps keep the fresh flavorof your coffee.
Regular cleaning stops build-upthat can clog your grinder. This build-up affects the grinder’s performance and makes it harder to use. Clean parts work smoothly and grind evenly every time.
Keeping your grinder clean also helps it last longer. Dirt and coffee dust can wear out the parts faster. A clean grinder needs fewer repairs and stays in good shape for many years.

Credit: www.smokecartel.com
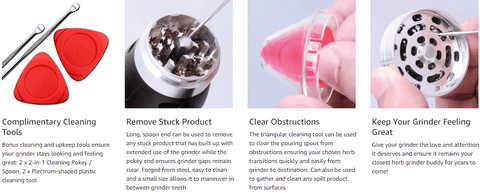
Tools You’ll Need
Gathering the right toolsmakes cleaning your grinder easier and faster.
- Basic cleaning supplieslike a soft cloth and warm water help remove loose debris.
- Specialized brushes and picksreach tight spots and clear stuck particles.
- Safe cleaning solutionssuch as isopropyl alcohol dissolve sticky residues without damage.
Using these tools regularly keeps the grinder working well and tasting fresh.
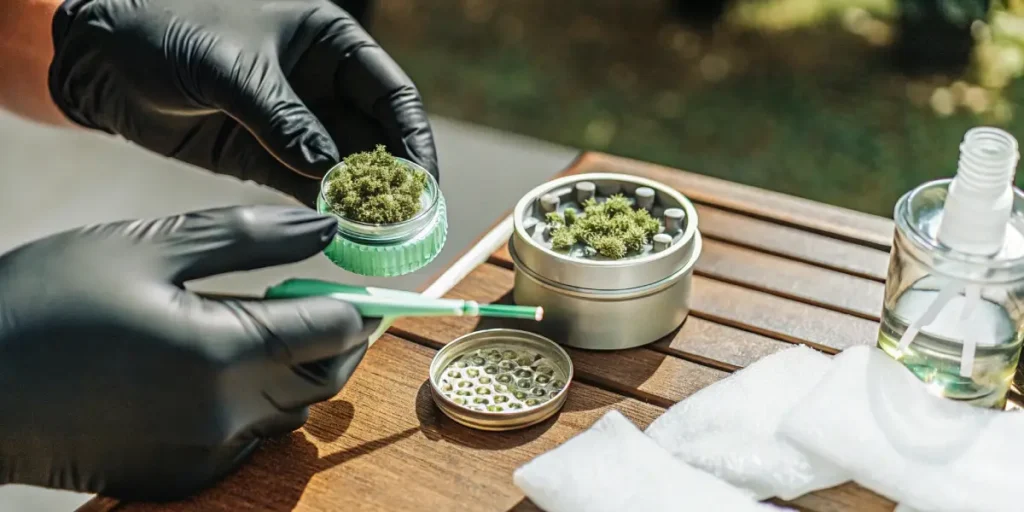
Step-by-step Cleaning Process
Begin by disassembling the grinder and removing leftover particles. Use a brush or cloth to clean each part carefully. Rinse with warm water and let everything dry before reassembling the grinder.
Disassembling The Grinder
Start by taking the grinder apart carefully. Separate all the pieces so you can reach every corner. Keep track of small parts to avoid losing them. This makes cleaning easier and more thorough.
Removing Residue And Debris
Use a small brush or toothpick to remove stuck bits. Tap the grinder gently to shake out loose particles. Wipe surfaces with a dry cloth to clear dust and crumbs. This step clears most leftover materials.
Deep Cleaning Techniques
| Cleaning Tool | Purpose |
|---|---|
| Isopropyl Alcohol | Dissolves sticky residue and oils |
| Warm Soapy Water | Removes dirt and softens grime |
| Soft Brush | Reaches small crevices |
Soak metal parts in alcohol or soapy water for 20 minutes. Use a brush to scrub gently. Avoid soaking plastic parts to prevent damage.
Drying And Reassembling
Dry all parts fully with a clean towel or air dry. Make sure no moisture remains to prevent rust. Put the grinder back together carefully. Check that all parts fit well and move smoothly.

Credit: westwoodfarmacy.com
Tips For Different Grinder Types
Manual grindersneed disassembly for thorough cleaning. Use a small brush to remove leftover particles. Wipe the parts with a damp cloth and dry them well before reassembling.
Electric grindersshould be unplugged before cleaning. Use a brush to clean the blades and container. Avoid water on the motor part to prevent damage.
| Blade Type | Cleaning Tips |
|---|---|
| Metal Blades | Use a dry brush or cloth. Avoid harsh chemicals to keep blades sharp. |
| Ceramic Blades | Clean gently with a soft brush. Ceramic blades chip easily if handled roughly. |
- Herb grindersoften have sticky residue. Use a toothpick or brush for small crevices.
- Coffee grindersneed regular cleaning to avoid old coffee smell. Wipe with a dry cloth.
- Both types benefit from occasional deep cleaning with mild soap and water on removable parts.
Maintaining Your Grinder
Keeping a regular cleaning schedulehelps your grinder work well. Clean it after every few uses to stop buildup. Use a soft brush or cloth to remove old residue. Avoid water on electric parts to prevent damage.
Avoid common mistakes like using too much force or harsh cleaners. These can break or wear down your grinder. Always handle parts gently and use mild soap if needed. Let parts dry completely before putting them back together.
Store your grinder in a dry and cool place. Keep it away from heat and moisture to prevent rust. Use a small container or box to protect it from dust and dirt.
Troubleshooting Common Issues
Stuck or jammed grindersoften happen because of old coffee grounds or debris. Clear the grinder by removing all parts carefully. Use a small brush or toothpick to clean tight spots. Avoid using water unless the manufacturer says it is safe. Regular cleaning prevents jams and keeps the grinder working smoothly.
Unpleasant odorscome from leftover oils and coffee residue. Wipe the grinder with a damp cloth and mild soap. Let it dry fully before use. Baking soda can help remove bad smells. Just sprinkle a little inside, wait, then wipe clean.
Uneven grindingaffects coffee taste. Check the burrs for damage or dirt. Adjust the grind settings to ensure consistency. Replace worn parts as needed. Consistent grind size makes coffee taste better and more balanced.
Frequently Asked Questions
How Often Should I Clean My Grinder?
Clean your grinder every 1-2 weeks to ensure optimal performance. Frequent cleaning prevents residue buildup and maintains flavor quality.
What Materials Are Best For Cleaning A Grinder?
Use isopropyl alcohol and a soft brush or cloth. Avoid harsh chemicals that could damage the grinder’s parts.
Can I Use Water To Clean My Grinder?
Water is not recommended for metal grinders as it can cause rust. Use alcohol or specialized cleaning solutions instead.
How Do I Remove Sticky Residue From My Grinder?
Soak grinder parts in isopropyl alcohol for 20-30 minutes. Then scrub gently with a brush to remove residue.
Conclusion
Cleaning your grinder keeps it working well and tasting fresh. Regular care stops build-up and clogs. Use simple tools and gentle cleaning methods. Take your time to clean every part carefully. A clean grinder helps your coffee or herbs taste better.
Keep a schedule to clean it often. This small effort brings great results. Your grinder will last longer and perform better. Enjoy smoother, fresher grinds every time you use it.