

If you own a portable slicer, you know how important a sharp blade is for quick, clean cuts. But when your blade gets dull, it can slow you down and ruin your food’s texture.
Don’t worry—replacing the blade is easier than you think. In this guide, you’ll learn simple steps to swap out your blade safely and quickly. Keep reading to make sure your slicer works like new every time you use it.
Credit: www.sliceproducts.com
Signs Blade Needs Replacement
A portable slicer should cut smoothly. If the blade struggles, it might be dull. Foods may not slice evenly, causing frustration. This affects meal presentation and quality. Replacing the blade ensures better slicing results.
Check the blade for any visible damage or rust. Chips or cracks can occur over time. Rust affects the blade’s sharpness and safety. A damaged blade can harm the slicer. Replace the blade if you see any issues.
Listen for strange sounds while slicing. Grinding or squeaking noises are red flags. These noises suggest blade wear or misalignment. A new blade can restore quiet operation. Keep your slicer running smoothly.
Preparing For Blade Replacement
Gathering the right toolsis key for blade replacement. Keep these items ready:
- A new compatible blade
- Screwdriver or Allen key matching your slicer’s screws
- Protective gloves for safe handling
- Cleaning cloth or brush
Safety comes first. Always unplug the slicerbefore starting. This stops any accidents or injuries.
Next, clean the slicer well. Remove food crumbs and grease. This helps in smooth blade removal and installation.
Use a cloth or small brush. Wipe the blade area and surrounding parts carefully.
Removing The Old Blade
Find the blade release mechanismon the slicer. It is often a button or lever near the blade area. This part allows the blade to come loose safely.
Check for screws or locks holding the blade in place. Use a screwdriver or the right tool to loosenthem carefully. Do not force the screws to avoid damage.
Hold the blade with a thick cloth or gloves to protect your hands. Slowly pull the blade away from the slicer. Make sure the blade is fully loose before removing it.
Credit: www.amazon.com
Installing The New Blade
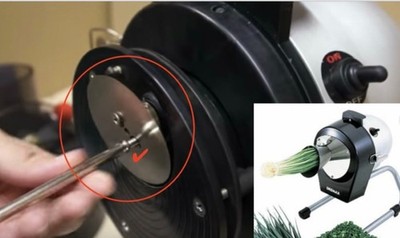
Place the new blade carefully on the slicer’s hub. Make sure the blade’s holes match the slicer’s pins or screws. This alignmentis key to safe and smooth slicing.
Use the screws and locks to hold the blade firmly in place. Tighten them just enough to keep the blade from moving. Avoid over-tightening, which can damage the blade or slicer.
Check the blade by gently trying to wiggle it. The blade must not move or feel loose. If it moves, retighten the screws and locks until stable.
Testing The Slicer After Replacement
After replacing the blade, reconnect the slicer to powersafely. Make sure the plug fits securely into the socket. Check the power switch is off before plugging in.
Perform a test sliceon a soft food item like bread or cheese. This helps to see if the blade cuts smoothly. Watch for any unusual noise or vibration.
Adjust the slicer settings if needed. Change the thickness dial to get the right slice size. If the blade is not slicing well, tighten or reposition it carefully.
- Check power connection before turning on
- Use soft food for the first test slice
- Listen for strange sounds during slicing
- Adjust thickness control for desired slice
- Tighten blade if cutting is uneven
Credit: www.ebay.com
Maintaining Blade For Longevity
Keeping the blade clean is key to good slicing. After each use, wipe it with a soft cloth and warm soapy water. Dry it well to stop rust. Avoid using harsh chemicals that can damage the blade.
Store the slicer in a dry place. Cover the blade with a guard or cloth to protect it from dust and moisture. This helps the blade stay sharp longer and prevents injuries.
| Sharpening | Replacing |
|---|---|
| Restores blade edge for smoother cuts | Needed when blade is chipped or dull beyond fix |
| Can be done with a sharpening tool or stone | Requires purchasing a new blade compatible with your slicer |
| Extends blade life and slicing quality | Ensures safety and best performance |
Frequently Asked Questions
How Do I Safely Remove The Old Blade From A Portable Slicer?
To safely remove the old blade, first unplug the slicer. Use a screwdriver if needed to loosen screws. Handle the blade carefully by its edges to avoid cuts. Dispose of the old blade in a blade-safe container to prevent injuries.
What Tools Are Needed To Replace A Portable Slicer Blade?
You typically need a screwdriver and gloves to replace the blade. Gloves protect your hands from sharp edges. Some slicers may also require an Allen wrench. Always refer to your slicer’s manual for specific tool requirements.
How Often Should I Replace The Blade On My Portable Slicer?
Replace the blade when it becomes dull or damaged. Frequent use may require blade changes every few months. A sharp blade ensures clean, safe slicing. Inspect the blade regularly for nicks or rust to maintain performance.
Can I Use Any Blade For My Portable Slicer?
No, use only blades compatible with your slicer model. Check the manufacturer’s specifications before buying a replacement. Using the wrong blade can cause damage or unsafe operation. Always choose high-quality, model-specific blades for best results.
Conclusion
Replacing the blade on your portable slicer keeps it sharp and safe. Always unplug the slicer before starting. Use the right tools and follow the steps carefully. Regular blade changes help the slicer work better and last longer. Taking time to clean and check the slicer after replacement also matters.
This simple task improves your slicing experience every time. Stay safe and enjoy perfectly sliced food with ease.