

Is your electric grill not heating up like it used to? A faulty heating element might be the problem—and fixing it yourself can save you time and money.
Imagine getting your grill back to perfect cooking temperature without buying a new one or calling a technician. In this guide, you’ll discover simple, step-by-step ways to repair your electric grill’s heating element safely and effectively. Keep reading, and you’ll be grilling your favorite meals again in no time!
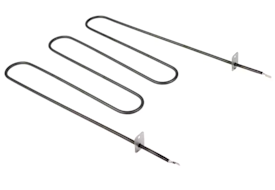
Credit: www.searspartsdirect.com
Signs Of A Faulty Heating Element
The heating element is a key part of an electric grill. It heats the grill so you can cook food properly. If the element breaks or stops working, the grill will not work well.
Knowing the signs of a bad heating element helps you fix the grill on time. This stops bigger problems and keeps your grill safe to use.
No Heat Production
If the grill does not get hot at all, the heating element might be broken. You may turn on the grill but feel no warmth after some time.
This problem stops you from cooking food because the grill does not reach the right temperature.
Uneven Cooking
The heating element may still work but not heat evenly. Some parts of the grill get hot, while others stay cold.
This causes your food to cook unevenly. You might find some parts of your meal burnt and others raw.
- Hot spots on the grill surface
- Cold areas where food does not cook
- Food needs longer time to cook
Burning Smell Or Sparks
A bad heating element can cause a burning smell or even sparks inside the grill. This is a sign of electrical trouble or damage.
Smell or sparks mean you should stop using the grill. These signs can point to a serious safety risk.
Tools And Materials Needed
Fixing an electric grill heating element needs the right tools and materials. Using the correct items helps you do the job safely and well.
This guide covers the basic hand tools, replacement parts, and safety gear you need for the repair.
Basic Hand Tools
You will need simple hand tools to open the grill and handle parts. These tools help you remove screws and check the heating element.
- Screwdriver set (flathead and Phillips)
- Needle-nose pliers
- Wire cutters or strippers
- Multimeter for testing electrical parts
- Wrench or socket set
Replacement Parts
Some parts may need replacement if they are broken or worn out. Having these parts ready saves time during repair.
- Heating element that matches your grill model
- Replacement screws or fasteners
- Electrical connectors or terminals
- Heat-resistant electrical tape
Safety Gear
Safety gear protects you from electric shocks and injuries. Always wear the right safety items when working on electrical appliances.
- Insulated gloves to prevent electric shock
- Safety goggles to protect eyes from debris
- Work apron or old clothes to avoid damage
- Non-slip shoes to prevent falls
Safety Precautions Before Repair
Repairing an electric grill heating element can be risky without the right safety steps. Always follow safety rules to avoid injury and damage.
Before starting, prepare your workspace and tools carefully. This will help you work safely and efficiently.
Unplugging The Grill
Always disconnect the grill from the power source before any repair. This stops electricity from causing shocks or short circuits.
- Find the grill’s power cord and plug.
- Unplug the grill from the wall outlet.
- Do not touch the grill if it is still connected to power.
- Check that the grill is completely off before proceeding.
Handling Electrical Components
Electric parts can hold charge even after unplugging. Use care when touching wires or the heating element.
| Safety Tip | Reason |
| Wear insulated gloves | Protects hands from electric shock |
| Use tools with insulated handles | Prevents current flow through tools |
| Do not touch wires with wet hands | Water conducts electricity |
| Discharge capacitors if present | Removes stored electrical energy |
Working In A Safe Environment
Create a work area that reduces risk. Clear clutter and keep tools organized for easy access.
- Work on a dry, flat surface
- Ensure good lighting
- Keep children and pets away
- Have a fire extinguisher nearby
- Wear safety glasses to protect eyes
Removing The Heating Element
Repairing an electric grill often means removing the heating element first. This part gets hot and cooks food. If it breaks, you must take it out carefully.
Follow these steps to remove the heating element safely. Make sure you have the right tools and work in a clean space.
Accessing The Element
First, unplug the grill and let it cool completely. Open the grill’s lid and find the heating element inside. You may need to remove the grill grates or drip tray to see it clearly.
Look for screws or clips holding the grill’s top cover or panel. Removing these will give you better access to the heating element.
Disconnecting Wires
Before touching wires, make sure the grill is unplugged. Locate the wires connected to the heating element. They usually have connectors or terminals.
Gently pull or unscrew the wire connectors to disconnect them. Do not pull the wires hard to avoid damage.
- Wear gloves to protect your hands
- Note which wire goes where for reassembly
- Use a small screwdriver if needed to loosen connectors
Removing Mounting Screws
Look for screws or bolts holding the heating element in place. These are usually near the ends of the element. Use a screwdriver to remove them carefully.
Once screws are removed, gently lift the heating element out. Avoid bending or twisting it as this can cause damage.
Testing The Heating Element
Testing the heating element is essential to fix an electric grill. This helps find out if the element works or needs replacement.
Using a multimeter is the best way to check the heating element’s condition. It measures electrical resistance and continuity.
Using A Multimeter
First, unplug the grill and remove the heating element. Set your multimeter to the resistance or ohms setting. Touch the probes to each end of the heating element.
- Make sure the multimeter is working by testing it on a known source.
- Place one probe on each terminal of the heating element.
- Read the resistance value shown on the multimeter display.
- A very high or infinite reading means the element is broken.
Interpreting Test Results
| Multimeter Reading | Meaning |
|---|---|
| Low resistance (few ohms) | Heating element is good |
| Very high or infinite resistance | Heating element is broken |
| Zero or near zero resistance | Possible short circuit in element |
Understanding these readings helps decide if the element needs repair or replacement.
Confirming The Fault
After testing, check the element visually for breaks or burn marks. You can also test the grill with a known working element.
- Inspect the element for visible damage.
- Test the element with a multimeter again to confirm results.
- Replace the element if tests show it is faulty.
- Reassemble the grill and test its heating function.
Fixing Minor Issues
Electric grills sometimes stop heating properly. Small problems can cause this. Fixing these can save you money.
Check the heating element and its parts first. Many times, cleaning or tightening parts helps.
Cleaning Corrosion
Corrosion can block electricity flow. This stops the grill from heating well. Clean corrosion carefully to fix this.
Use a soft brush and a mix of baking soda and water. Gently scrub the corroded parts until clean. Dry everything before testing the grill.
Tightening Connections
Loose wires or screws cause heating problems. Check all electrical connections on the grill.
Use a screwdriver to tighten screws and connectors. Make sure wires fit tightly without damage.
- Unplug the grill before starting
- Inspect all wire connections
- Tighten screws and clamps carefully
- Replace damaged wires if found
Replacing Fuses
Fuses protect the grill from electrical faults. A blown fuse stops the heating element from working.
Locate the fuse holder and check the fuse. Replace it with one of the same size and rating if it is damaged.
- Unplug the grill
- Find the fuse holder
- Remove and inspect the fuse
- Install a matching new fuse
- Test the grill after replacement
Replacing The Heating Element
Electric grills use heating elements to cook food evenly. If the element stops working, you need to replace it.
Replacing the heating element is a simple fix. It helps restore your grill’s performance quickly.
Choosing The Correct Replacement
Find the exact heating element made for your grill model. Using the wrong part can cause damage.
Check the model number on your grill or in the manual. Use this number to buy the right element.
- Look for the same voltage and wattage rating
- Match the shape and size of the old element
- Choose a part from a trusted supplier
Installing The New Element
Unplug the grill and let it cool before starting. Safety is important when working with electrical parts.
Remove screws or clips holding the old element. Gently take out the old element from its place.
- Keep screws safe for reuse
- Handle the new element carefully
- Place the new element in the same position
Reconnecting Wires
Note how wires connect to the old element before removing them. This helps connect the new element correctly.
Attach wires to the new element’s terminals firmly. Loose connections can cause sparks or failure.
- Match wire colors to the correct terminals
- Use a screwdriver to tighten terminal screws
- Check all connections are secure before closing
Testing The Grill After Repair
After fixing the electric grill heating element, testing is important. This ensures the repair worked well and the grill is safe to use.
Testing involves turning the grill on carefully, checking how heat spreads, and watching for any problems.
Powering On Safely
Turn the grill on in a safe place. Make sure the grill is on a flat, heat-resistant surface.
Keep flammable items away. Use a circuit with proper voltage and avoid overloading power outlets.
- Plug the grill directly into the wall socket
- Turn on the power switch gently
- Stay near the grill for quick action
- Have a fire extinguisher ready just in case
Checking Heat Distribution
Look at how the grill heats up. The heat should spread evenly across the cooking surface.
Use your hand to feel for hot spots or cold spots carefully. Avoid touching the grill directly to prevent burns.
- Check different areas of the grill surface
- Note any cold spots where food may not cook well
- Watch for very hot spots that could burn food
- Adjust or repair again if heat is uneven
Monitoring For Issues
Watch the grill for any unusual signs. These include strange smells, sparks, or noises.
If you see any smoke or smell burning plastic, turn off the grill immediately. Check the wiring and heating element again.
- Listen for buzzing or popping sounds
- Look for smoke or sparks
- Smell for burning odors
- Turn off the grill if any issue appears
- Do not use the grill until fixed
Maintenance Tips To Extend Element Life
Electric grill heating elements last longer with proper care. Simple maintenance keeps them working well.
Follow easy tips to avoid damage and save money on repairs.
Regular Cleaning
Clean the heating element after every use. Remove food bits and grease to stop buildup.
Use a soft cloth or brush. Avoid harsh chemicals that can damage the element.
- Unplug the grill before cleaning
- Wipe with a damp cloth once cooled
- Use mild soap if needed
- Dry completely before next use
Avoiding Overheating
Do not run the grill on high heat for too long. Overheating wears out the element fast.
Watch the temperature controls and adjust heat as needed during cooking.
- Preheat only for recommended time
- Use medium heat for most foods
- Turn off grill soon after cooking
Proper Storage
Store the grill in a dry, cool place when not in use. Moisture can cause rust on the element.
Cover the grill to keep dust and dirt off the heating element.
- Unplug and cool before storing
- Use a grill cover or cloth
- Keep away from humid areas

Credit: www.youtube.com

Credit: www.grillcleaninglosangeles.com
Frequently Asked Questions
How To Identify A Faulty Heating Element?
To identify a faulty heating element, check for visible signs like burns or breaks. Test with a multimeter to see if there’s continuity. If there’s no continuity, it indicates a problem. A faulty element will not heat evenly or at all, affecting the grill’s performance.
What Tools Are Needed To Repair An Electric Grill?
You will need a screwdriver, multimeter, and replacement parts. A cleaning brush and sandpaper might also be helpful. Ensure you have protective gloves and safety goggles. These tools will help you safely diagnose and repair the heating element of your electric grill.
Can I Repair The Heating Element Myself?
Yes, you can repair it yourself with the right tools. Ensure safety by unplugging the grill before starting. Follow the manufacturer’s instructions carefully. If you’re unsure, consult a professional to avoid further damage or hazards.
How Often Should I Check The Heating Element?
Check the heating element every three months for optimal performance. Regular inspection helps identify wear and tear early. This prevents unexpected breakdowns and prolongs the grill’s lifespan. Cleaning it regularly also ensures efficient heat distribution during grilling.
Conclusion
Repairing your electric grill heating element is easier than it seems. Check the wires and connections carefully. Replace the damaged parts with the right tools. Test the grill after fixing it to ensure safety. Regular maintenance helps avoid future problems.
Taking small steps saves money and time. You can enjoy grilling again without stress. Keep your grill in good shape for longer use. Simple repairs make a big difference in performance. Stay safe and follow instructions closely.