
Are you looking for a simple way to make a grinder yourself? Whether you want to save money, customize your tool, or just enjoy a fun DIY project, this guide is made for you.
Imagine having a grinder that fits your needs perfectly and knowing exactly how it works. You will learn easy steps to create your own grinder with materials you can find around you. Keep reading, and by the end, you’ll feel confident building a grinder that works just right for you.

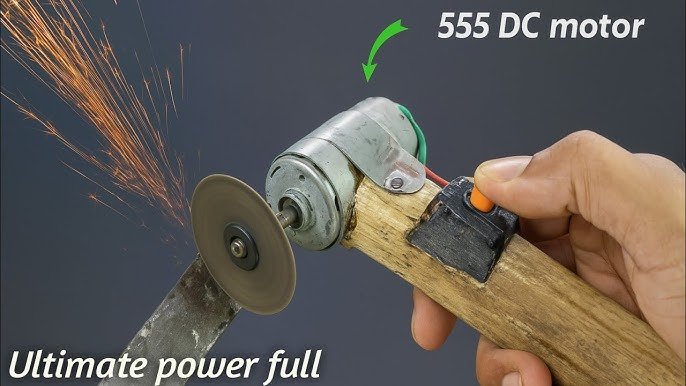
Credit: www.youtube.com
Choosing The Right Materials
Grinders come in different types, such as hand grinders, electric grinders, and burr grinders. Each type has a unique way of working and suits different tasks. Hand grinders are simple and easy to use but need more effort. Electric grinders save time and energy by working fast. Burr grinders give uniform size, which is good for fine work.
Choosing the right materialsis very important. Metal parts like stainless steel or aluminum are strong and last long. Plastic parts are lighter but less durable. Wood can be used for handles or outer covers, giving a nice look and feel. Always pick materials that fit your grinder type and use.
| Essential Tools | Purpose |
|---|---|
| Screwdriver | To assemble parts |
| Drill | To make holes |
| Sandpaper | To smooth edges |
| Pliers | To hold and bend parts |
| Measuring tape | To measure parts accurately |
Preparing The Workspace
Safetyis the first priority. Wear protective gloves and goggles. Keep a first-aid kit nearby. Avoid loose clothing to prevent accidents. Work in a well-ventilated area to reduce dust and fumes.
Clear your workspace. Organize tools like files, saws, and screwdrivers. Lay them out so you can reach everything easily. This saves time and stops you from losing small parts.
- Check power tools before use.
- Keep a clean surface to prevent slips.
- Use clamps to hold materials steady.
- Turn off tools when not in use.
Designing Your Grinder
The basic grinder structureincludes a few key parts. A containerholds the material to grind. Inside, sharp bladesor burrs crush the material. A lidkeeps everything inside while grinding.
Materials for the grinder can be metal, plastic, or wood. Each has pros and cons. Metal is strong but heavy. Plastic is light but less durable. Wood looks nice but may wear out.
- Choose a container size based on how much you need to grind.
- Blades must be sharp and sturdy for better grinding.
- Ensure the lid fits tightly to avoid spills.
Customizing for efficiency means making the grinder easier to use. Adding a handleor motorsaves effort. A clear container helps see the grinding progress.
Changing blade shape affects how fine the grind gets. More blades usually mean faster grinding. Also, design the grinder so it is easy to clean.

Credit: www.youtube.com
Cutting And Shaping Components
Measuring and marking are key to cutting parts correctly. Use a ruler or tape measure to get exact sizes. Mark lines clearly with a pencil or marker. Double-check measurements to avoid mistakes. Mark every piece before cutting.
Cutting tools must be sharp and safe to use. Tools like saws, files, or rotary cutters work well. Cut slowly and follow the marked lines closely. Use clamps to hold pieces steady. Wear safety glasses to protect your eyes.
Assembling The Grinder
Ensure all parts fit tightly together. Loose connections can cause problems later. Use screws or clips to hold parts firmly in place. Double-check that no gaps remain between pieces.
Test the moving components carefully. Turn the grinder handle slowly to check smooth motion. If parts stick or jam, adjust or realign them. Lubricate the joints lightly for better movement.
- Check that blades rotate without wobbling.
- Make sure the handle turns easily.
- Confirm no parts move too freely or are too tight.
Finishing Touches
Smooth edges and tight fitting parts give your grinder a polished look. Checking for any loose pieces ensures it works well and lasts longer. Simple adjustments can make your grinder both safe and easy to use.
Sanding And Polishing
Sandingsmooths rough edges and surfaces of the grinder. Use fine-grit sandpaper for best results. Sand the parts gently until they feel smooth to touch. Polishingadds shine and protects the metal from rust. Use a soft cloth and a small amount of polish. Rub in circular motions for a clean finish. This step makes the grinder look better and last longer.
Adding Handles Or Cranks
Choose a handle or crank that fits well on your grinder. Attach it firmly to the rotating part. Handles can be made from wood or metal. Make sure the handle turns easily without wobbling. A good handle helps grind smoothly and saves effort.
Maintenance Tips
Cleaning your grinder helps it work well and last longer. Take it apart carefully. Use a small brush to remove leftover bits inside. Warm water and mild soap clean the parts well. Dry all pieces completely before putting them back.
Common issues include grinders sticking or not turning smoothly. Check for jammed pieces or buildup. Tighten loose screws to keep parts in place. If the grinder makes noise, oil the moving parts lightly. Always test after cleaning or fixing to ensure smooth use.

Credit: www.youtube.com
Frequently Asked Questions
What Materials Do I Need To Make A Grinder?
You need metal or wood, a blade or burr, screws, and a handle. Choose durable materials to ensure longevity and efficiency.
How Long Does It Take To Make A Grinder?
Making a simple grinder can take 1 to 3 hours. Time varies based on design complexity and tools available.
Can I Make A Grinder Without Specialized Tools?
Yes, basic grinders can be made using household tools like a drill and screwdriver. Precision tools improve quality but aren’t mandatory.
What Safety Precautions Are Needed When Making A Grinder?
Wear gloves and eye protection. Work in a well-ventilated area and handle sharp components carefully to avoid injuries.
Conclusion
Making a grinder is easier than it seems. Follow each step carefully to build your own. Use simple tools and materials you have at home. Take your time and stay safe while working. This project can save money and give you satisfaction.
Try it out and enjoy the process of creating. Keep practicing to improve your skills over time. Making things by hand feels rewarding and fun. Give it a go and see how it works!