
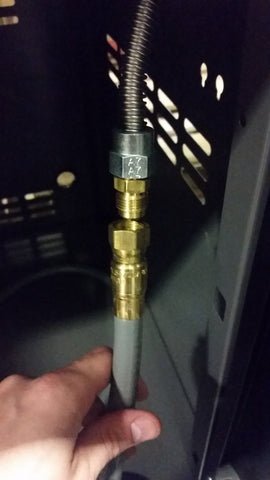
Are you ready to take your outdoor cooking to the next level? Connecting a gas line to your built-in grill might seem tricky, but with the right steps, you can do it safely and confidently.
Imagine firing up your grill with ease, enjoying perfectly cooked meals every time, and impressing your friends and family. In this guide, you’ll discover simple, clear instructions that make the process straightforward—even if you’ve never done it before. Keep reading, and you’ll be grilling like a pro in no time!
Safety First
Connecting a gas line to a built-in grill requires care and attention. Safety should always come first to avoid accidents.
Follow safety steps before you start. These tips help protect you and your home.
Check Local Codes
Local codes set rules for gas line installation. They keep work safe and legal.
Contact your city or county office to learn the rules. Some areas need a permit or inspection.
Turn Off Gas Supply
Before working on the gas line, always turn off the gas supply. This stops leaks and fires.
Find the main gas valve near your grill or meter. Turn it clockwise to close it.
- Confirm the gas is off by trying to light the grill
- Never work on the gas line if you smell gas
- Call a professional if you suspect a leak
Use Protective Gear
Wear protective gear to guard yourself while working. Safety glasses and gloves protect your eyes and hands.
Use tools with insulated handles. This reduces the risk of electric shock or burns.
- Wear safety glasses to protect your eyes
- Use gloves to avoid cuts and burns
- Wear long sleeves to protect your arms
- Use proper tools designed for gas work

Credit: www.familyhandyman.com
Gather Tools And Materials
Connecting a gas line to a built-in grill needs careful preparation. You must gather all the right tools and materials before starting the work.
This guide covers the main items you will need. Getting them ready helps make the job safe and easy.
Required Tools List
Having the correct tools is important for a secure gas line connection. These tools will help you measure, cut, and tighten fittings.
- Pipe wrench
- Adjustable wrench
- Pipe cutter or hacksaw
- Gas leak detector spray or soapy water
- Teflon tape (thread seal tape)
- Thread sealant paste
- Measuring tape
- Gas-rated flexible hose (if needed)
Choosing The Right Gas Line
Select the gas line type that matches your grill and local codes. The most common types are black steel pipe and flexible stainless steel hose.
| Gas Line Type | Use | Notes |
|---|---|---|
| Black steel pipe | Permanent installations | Needs threading and sealing |
| Flexible stainless steel hose | Connects grill to main line | Easy to install and move |
Sealants And Tapes
Sealants and tapes prevent gas leaks at connection points. Use products made for gas lines only.
- Teflon tape:Wrap on pipe threads to seal joints.
- Thread sealant paste:Apply on threads for extra leak protection.
- Gas-approved leak detector spray:Use after installation to check for leaks.
Prepare The Grill And Gas Line
Connecting the gas line to a built-in grill needs careful preparation. You must check the grill and gas line before starting.
This guide covers inspecting the grill connection, measuring and cutting the gas line, and cleaning the connection points.
Inspect The Grill Connection
Look closely at the grill’s gas connection point. Check for any damage or dirt that might block the gas flow. Make sure the connection is tight and fits the gas line properly.
Measure And Cut Gas Line
Measure the distance from the gas source to the grill connection. Add a little extra length to allow for movement.
- Use a pipe cutter or sharp tool to cut the gas line cleanly.
- Make sure the cut end is smooth and free of burrs.
- Do not stretch or twist the gas line during cutting.
Clean Connection Points
Clean all connection points before attaching the gas line. Dirt or grease can cause leaks or poor connection.
| Connection Point | Cleaning Method |
|---|---|
| Grill fitting | Wipe with a clean cloth |
| Gas line end | Use a soft brush to remove debris |
| Threaded parts | Check for old sealant and remove |

Credit: www.angi.com
Connect The Gas Line
Connecting the gas line to your built-in grill is an important task. It needs care and attention to keep it safe and working well.
Follow these steps to attach the gas line correctly. This will help prevent leaks and ensure a steady gas flow.
Attach Fittings Securely
Start by attaching the fittings to the gas line and grill. Make sure each fitting matches the gas type and size.
Push the fittings together firmly. Loose fittings can cause gas leaks, which are dangerous.
Apply Thread Sealant
Use a thread sealant on the threaded parts of the fittings. This helps create a tight seal that stops gas from escaping.
Choose a sealant made for gas connections. Avoid using regular tape or glue.
- Clean threads before applying sealant
- Wrap sealant around threads evenly
- Do not use too much sealant
Tighten Connections Properly
Use a wrench to tighten the fittings. Tighten them enough to stop leaks but avoid over-tightening.
Check all connections for leaks after tightening. Use a soapy water solution to find bubbles that show leaks.
Test For Leaks
After connecting the gas line to your built-in grill, testing for leaks is important. This keeps you safe and prevents gas waste.
There are simple methods to check for leaks before you use the grill. Follow these steps carefully.
Use Soapy Water Method
Mix liquid soap with water to create a soapy solution. Apply this solution to all gas connections using a brush or spray bottle.
- Turn on the gas supply slowly without lighting the grill.
- Watch for bubbles forming at connection points.
- Bubbles mean there is a gas leak present.
- If no bubbles appear, the connections are secure.
Check For Gas Smell
Smelling gas near your grill can signal a leak. Gas has a distinct sulfur or rotten egg odor added for safety.
Use this checklist to stay safe if you detect a gas smell:
- Turn off the gas supply immediately.
- Do not light any flames or turn on electrical switches.
- Ventilate the area by opening windows and doors.
- Check all connections again using the soapy water method.
- Call a professional if the smell continues.
Address Any Leaks
If you find a leak, do not use the grill until fixed. Tighten fittings or replace damaged parts as needed.
| Leak Cause | Solution |
|---|---|
| Loose connection | Tighten the fitting with a wrench |
| Damaged hose | Replace with a new gas-rated hose |
| Worn valve | Replace the valve or call a technician |
Final Setup And Maintenance
Connecting a gas line to a built-in grill requires careful final setup and regular maintenance. Proper steps ensure safety and long grill life.
This guide covers how to position the grill correctly, inspect it regularly, and know when to call a professional for help.
Position The Grill
Place your built-in grill in a well-ventilated area. Avoid tight spaces to prevent gas buildup and fire hazards.
Make sure the grill is stable and level. This helps with even cooking and prevents accidents.
- Keep at least 10 feet away from structures
- Ensure clear space above the grill
- Check for easy access to the gas shutoff valve
Regular Inspection Tips
Inspect the gas line and connections often to avoid leaks. Look for cracks, rust, or loose fittings.
Test for leaks by applying soapy water to connections. Bubbles show a leak that needs fixing.
- Check hoses for wear or damage
- Clean burner ports to prevent clogs
- Verify the gas pressure is correct
- Replace any damaged parts immediately
When To Call A Professional
Call a professional if you smell gas after setup. Do not try to fix gas leaks yourself.
Seek expert help for major repairs or if you are unsure about the gas connection safety.
- Gas smell or hissing sound near connections
- Damaged gas line or fittings
- Failure to light or uneven flames
- Need to upgrade or move the gas line

Credit: www.angi.com
Frequently Asked Questions
How Do I Safely Connect A Gas Line To A Built-in Grill?
Turn off the main gas supply before starting. Use approved connectors and fittings. Check for leaks with soapy water after connection. Always follow manufacturer instructions and local codes for safety.
What Tools Are Needed To Connect A Gas Line To A Grill?
You need a pipe wrench, adjustable wrench, Teflon tape, and a gas line connector. A leak detector solution or soapy water helps check connections for leaks. Proper tools ensure a secure, leak-free connection.
Can I Connect A Propane Tank To A Built-in Grill?
Yes, you can connect a propane tank using proper regulators and hoses. Ensure the tank and grill are compatible. Follow safety guidelines and check for leaks after connecting the propane tank.
How To Check For Gas Leaks After Connection?
Apply soapy water to all connections. Turn on the gas supply briefly. Look for bubbles forming, indicating leaks. If bubbles appear, tighten connections or replace faulty parts immediately.
Conclusion
Connecting a gas line to your built-in grill is safer with the right steps. Always check for leaks before lighting the grill. Use proper tools and follow local safety rules. Take your time and do not rush the process. A well-connected gas line means better grilling and peace of mind.
Enjoy cooking outdoors with confidence and safety.