
Your smart oven is a game-changer in the kitchen, making cooking faster and more efficient. But like any other appliance, it needs regular cleaning to keep it in top shape.
You might wonder why cleaning is so crucial and how exactly to do it without damaging the smart features. Imagine how satisfying it would be to see your oven spotless and functioning perfectly, ready for your next culinary adventure. In this guide, you’ll discover simple, effective ways to clean your smart oven.
No complicated steps, just straightforward advice that ensures your oven stays as smart as the day you got it. Dive in, and let’s make your oven shine!

Credit: www.youtube.com
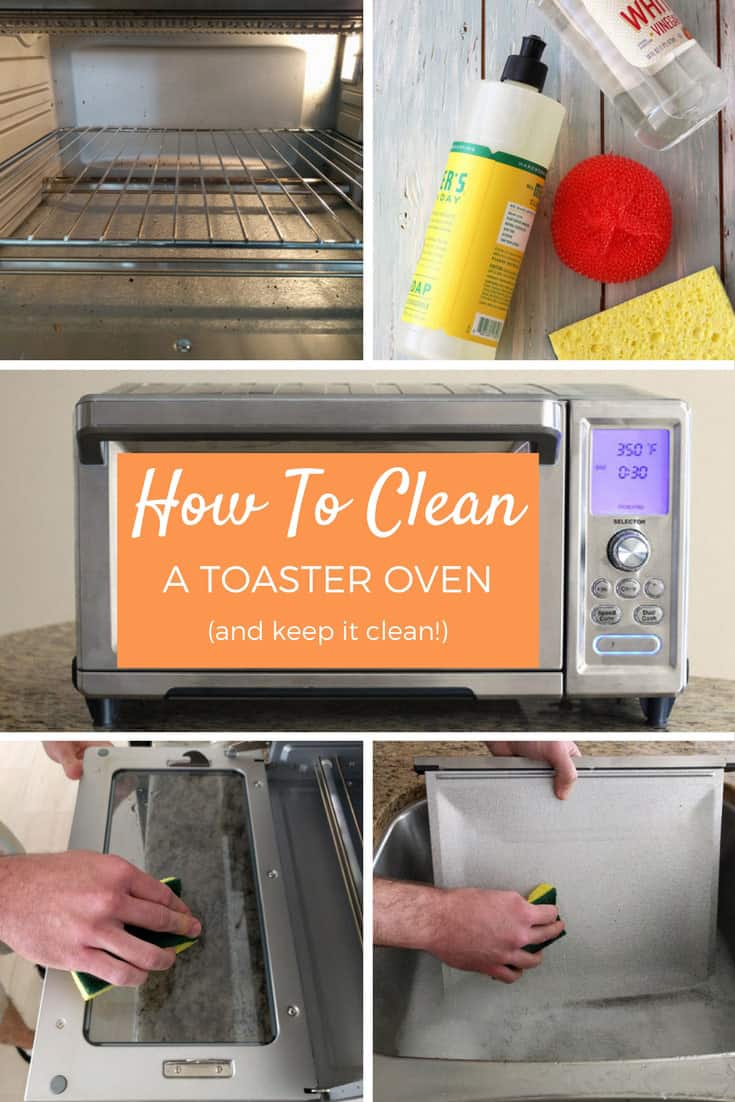
Gather Necessary Supplies
First, find a soft cloth or sponge. This will help you clean gently. Next, grab a small bowl. You will use it for mixing. Get some mild dish soap. It will remove grease. Also, have a bottle of white vinegarready. Vinegar helps with stubborn spots. Don’t forget a clean microfiber clothfor drying. You also need a scrubbing brush. It’s good for tough dirt. Finally, gather some baking soda. This is great for removing smells.
Having all these supplies makes cleaning easier. Now you are ready to start cleaning your smart oven. It will look shiny and new. Always keep these items handy. They make cleaning quick and simple.

Credit: www.reddit.com
Power Off And Unplug
First, switch off the smart oven. Safety is the most important thing. Unplug the oven from the wall. Check if the oven is really off. Feel safe before cleaning. Electricity can be dangerous. Follow these steps each time. Smart ovens need care. Think about your safety before cleaning.
Remove any loose parts inside. Trays and racks come out easily. Wash them in the sink. Warm water works best. Use soap for cleaning. Dry them well before placing back. A clean oven makes food taste better. Safety means unplugged and off. Your oven needs care.
Remove Interior Components
Start by removing the oven racksand trays. These parts can be cleaned separately. Gently slide them out to avoid scratches. Use a soft cloth for wiping. For tough spots, use a mild soap. Rinse thoroughly with water. Dry them completely before placing back.
Next, detach any accessories or attachmentsinside the oven. These may include rotating plates or holders. Remove them carefully to prevent damage. Clean each item with a damp cloth. Ensure no soap residue remains. Allow them to dry in the air. Reattach once fully dry.
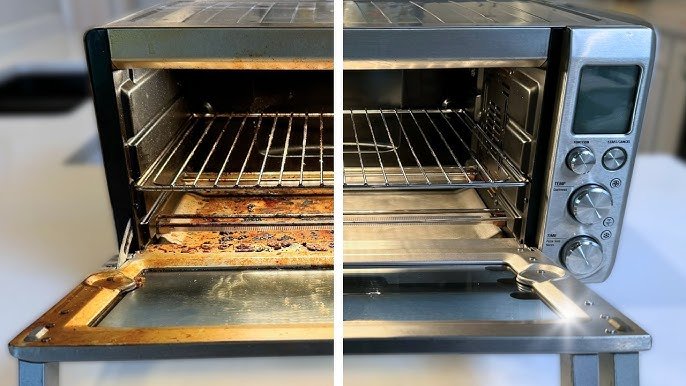
Clean Interior Surfaces
Use a soft, damp cloth to clean the oven’s walls. Avoid using rough sponges. Gentle wiping keeps the surfaces smooth and shiny. Make sure the cloth is not too wet. Excess water can damage the oven.
Stubborn stains need special attention. Mix a paste of baking soda and water. Apply it to the stain and let it sit for 15 minutes. Use a soft brush to scrub the area gently. Rinse with a clean, damp cloth. Repeat if needed for tough spots.
Clean Exterior Surfaces
Use a soft cloth for the control panel. Avoid harsh chemicals. Gentle cleaners work best. Spray cleaner on the cloth, not the panel. Wipe gently to remove fingerprints and smudges. Ensure the panel is completely dry.
Start with the oven door. Use a glass cleaner for shiny results. Buff with a soft cloth until it sparkles. Focus on the handle next. Stainless steel cleaner is ideal. Wipe in a circular motion. Dry thoroughly to prevent streaks.
Credit: www.cbgurgaon.com
Clean Removable Components
Removing components makes smart oven cleaning easier. Detach racks and trays for separate cleaning. Wipe them gently with warm, soapy water.
Wash Racks And Trays
First, take out all the racks and trays from the oven. Fill a sink with warm soapy water. Place the racks and trays in the water. Let them soak for 10 minutes. This will loosen any stuck food. Use a soft sponge to scrub them gently. Rinse with clean water and dry with a towel.
Clean Accessories
Take out the oven accessories like the thermometer or pizza stone. Wipe them with a damp cloth. For stubborn stains, use a mix of baking soda and water. Make a paste and rub it on the stains. Rinse well and dry completely before putting them back.
Check And Clean Vents
Smart ovens have air vents. These vents help keep the oven cool. Dirt and grease can block these vents. This can make your oven overheat. It is important to keep vents clear. Use a soft brush to clean them. Gently wipe away any dust. Do this often to keep your oven working well.
A blocked vent can cause problems. It can even damage your oven. Cleaning vents is easy and takes little time. Regular cleaning helps your oven last longer. It also keeps your food cooking evenly. Make sure to check vents each month.
Inspect And Clean Sensors
Smart ovens have sensors. Sensors help control cooking. Dirt can block sensors. Blocked sensors can cause cooking problems. Regular cleaning is important. Use a soft cloth. Gently wipe sensors. Avoid using water directly. Moisture can damage sensors. Check for any visible dirt. Remove any stuck particles.
Cleaning should be done monthly. Monthly cleaning keeps sensors working well. Proper care extends oven life. Treat your smart oven well. It will cook better. Happy cooking!
Reassemble And Plug In
Each part must be dry before reassembling. Avoid moisture inside the oven. Fit every piece back carefully. Check if the door is secure. Ensure the racks are in place. Verify the buttons are working.
Next step is plugging the oven in. Handle the plug gently. Ensure the cord is not tangled. Place the oven in its spot. Check the power light. Watch for any issues.
Test Functionality
Smart ovens have many functions. Testing them helps keep the oven working. Start by checking the touchscreen. Make sure it responds quickly. Try all buttons and settings. Ensure they work as expected. Voice control should also be tested. Speak commands clearly to see if the oven listens. Test the smart app connected to the oven. Ensure you can change settings from your phone. Check if temperature settings are accurate. Use a thermometer if needed. Try cooking a simple dish. Confirm it cooks evenly. Listening for strange noises can help identify problems. A well-tested oven lasts longer and cooks better.
Frequently Asked Questions
How Do I Clean My Smart Oven?
Start by unplugging your smart oven. Use a damp cloth and mild detergent to wipe the interior and exterior. Avoid abrasive cleaners and harsh scrubbing. Clean the oven racks separately in warm, soapy water. Dry thoroughly before plugging back in and using the oven again.
How To Self-clean A Smart Things Oven?
Press the “Self-Clean” button on your Smart Things oven. Select the desired cleaning duration. Close the oven door securely. Confirm the self-clean cycle by pressing “Start. ” Wait for the cycle to complete, and let the oven cool before opening.
Always follow the manufacturer’s guidelines for safe cleaning.
How Do I Clean The Inside Of My Breville Smart Oven?
Unplug the oven. Remove crumb tray and racks. Wipe interior with a damp cloth. Avoid abrasive cleaners. Dry thoroughly.
Can You Use A Magic Eraser To Clean The Inside Of A Toaster Oven?
Using a magic eraser inside a toaster oven is not recommended. It can leave residue and damage surfaces. Instead, use a damp cloth with mild soap for safe cleaning. Always unplug the toaster oven before cleaning to ensure safety. Regular maintenance helps maintain its efficiency and longevity.
Conclusion
Cleaning a smart oven keeps it efficient and long-lasting. Regular maintenance prevents grime buildup. Use mild soap and a soft cloth. Avoid harsh chemicals. Always unplug the oven first. Check the manual for specific cleaning instructions. Focus on the glass door and racks.
Clean spills immediately to prevent stains. Regular cleaning ensures delicious meals every time. Keep your smart oven in top shape with these simple steps. Enjoy hassle-free cooking with a clean appliance. A well-maintained oven serves you better. Happy cooking!