
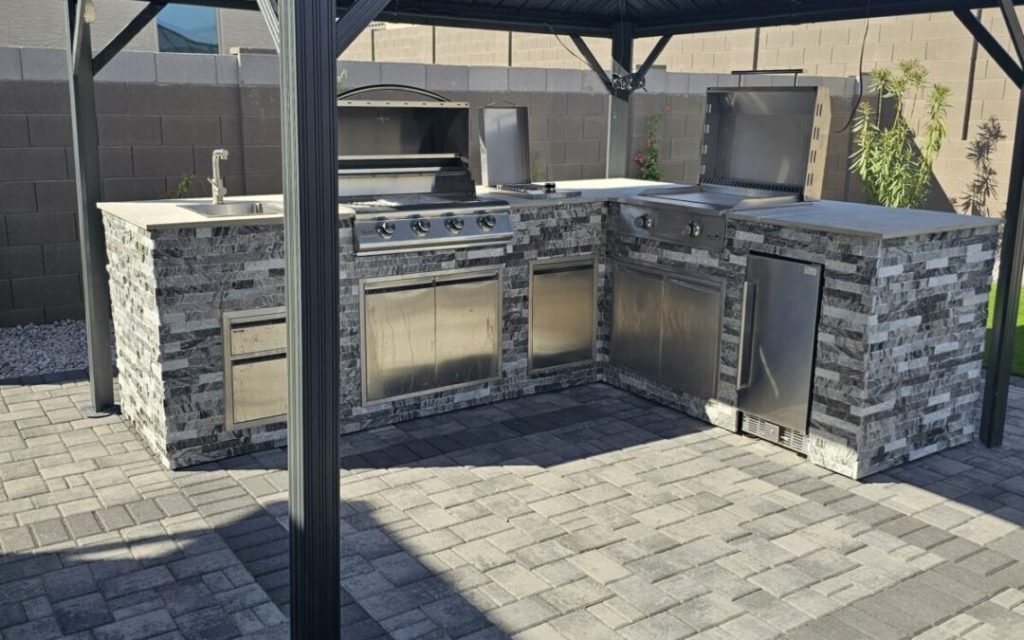
Imagine turning your backyard into the ultimate gathering spot where friends and family can enjoy delicious grilled meals all year round. Building your own stone outdoor kitchen grill is not only a fantastic way to enhance your outdoor space but also a smart investment that adds value to your home.
You don’t need to be a professional builder to create a sturdy, beautiful grill that will impress everyone. In this guide, you’ll discover simple steps and practical tips to build a stone outdoor kitchen grill that suits your style and needs.
Ready to transform your outdoor cooking experience? Let’s get started!
Planning Your Stone Grill
Building a stone outdoor kitchen grill takes careful planning. This helps create a space that works well and looks good.
Think about the location, design, and budget before you start building. These steps make the project easier.
Choosing The Right Location
Pick a spot that is flat and stable for your stone grill. Avoid places with poor drainage or soft soil.
Choose a location near your home or dining area. This makes cooking and serving food easier.
- Ensure good ventilation around the grill
- Keep away from low-hanging branches or flammable materials
- Consider sun and wind direction for comfort
- Check local rules about outdoor grills
Design And Layout Options
Decide how big your stone grill will be. Think about how many people you want to cook for at once.
Plan where to place the grill, prep area, and storage. A good layout makes cooking easier and more fun.
- Include countertops for food prep
- Add storage for utensils and supplies
- Consider built-in features like sinks or refrigerators
- Choose materials that match your home’s style
Setting A Budget
Decide how much money you can spend on your stone grill project. This helps you avoid overspending.
Include costs for materials, tools, and any help you may need. Keep a little extra for unexpected expenses.
- Stone and mortar materials
- Grill unit and cooking equipment
- Tools and safety gear
- Labor or professional help if needed

Credit: genstone.com
Selecting Materials
Building a stone outdoor kitchen grill starts with choosing the right materials. The materials affect durability and appearance.
Good materials make your kitchen last longer and look great in your backyard.
Types Of Stones For Outdoor Kitchens
Choose stones that resist weather and heat. Natural stones like granite and limestone work well outside.
- Granite: Very strong and heat-resistant.
- Limestone: Offers a classic look but needs sealing.
- Sandstone: Porous but easy to shape.
- Slate: Dark color and smooth texture.
- Fieldstone: Rough, natural appearance.
Mortar And Adhesives
Mortar holds stones together. Use a mix made for outdoor use. It must handle heat and weather changes.
| Type | Use | Key Feature |
| Type N Mortar | General stonework | Good flexibility |
| Type S Mortar | High strength projects | Stronger than Type N |
| Polymer Adhesive | Special stone bonding | Waterproof and strong |
Grill Components And Accessories
Choose grill parts that fit your cooking needs. Stainless steel parts last long and resist rust.
- Grill body: Stainless steel is best for durability.
- Burners: Choose ceramic or stainless steel for even heat.
- Side shelves: Provide workspace and storage.
- Cover: Protect your grill from rain and dust.
- Lighting: Add for night cooking.
Preparing The Site
Building a stone outdoor kitchen grill starts with preparing the site properly. A well-prepared site ensures your grill will be stable and last for years.
This guide covers clearing and leveling the area, building a solid foundation, and drainage considerations for your outdoor kitchen.
Clearing And Leveling The Area
First, remove any plants, rocks, or debris from the chosen location. Clear the space to create a smooth, open area for your grill.
- Cut grass and remove roots
- Pick up stones and sticks
- Dispose of all debris properly
- Check for underground utilities before digging
- Use a rake to smooth the soil surface
Next, level the area by filling low spots with soil and removing high spots. Use a long board and a level tool to check the flatness.
Building A Solid Foundation
A strong foundation supports the weight of the stone grill and prevents cracks. Use concrete or compacted gravel for the base.
- Mark the foundation area with stakes and string
- Dig 6 to 12 inches deep depending on soil type
- Fill the hole with gravel and compact it
- Pour a concrete slab and smooth the surface
- Allow the concrete to cure for at least 24 hours
Drainage Considerations
Drainage prevents water from pooling around your kitchen, which can cause damage or mold.
| Drainage Method | Description | Benefits |
| Sloped Surface | Grade the site to slope away from the grill | Water flows off naturally |
| Drainage Pipes | Install pipes to carry water away | Prevents water buildup under foundation |
| Gravel Bed | Place gravel beneath foundation | Improves water drainage and soil stability |
Choose one or more methods to keep your outdoor kitchen dry and stable over time.
Credit: genstone.com
Building The Base Structure
Building a stone outdoor kitchen grill starts with a strong base. A solid base supports the weight of the stone and grill.
Careful planning and careful building ensure your outdoor kitchen lasts a long time.
Laying The Stone Walls
Start by marking the area for your stone walls. Use a level and string to keep walls straight and even.
Place the first layer of stones carefully on a concrete footing. Make sure each stone fits tightly with the next.
- Use mortar to hold stones together
- Check alignment regularly with a level
- Clean excess mortar from stones
- Allow mortar to dry fully before next layer
Creating Openings For Grill And Storage
Plan openings for the grill and storage before you build walls. Mark these spaces on your base layout.
Build stone walls around the openings. Use wood or metal frames to keep openings clear during construction.
- Measure grill size carefully
- Leave space for air flow around the grill
- Design storage openings for easy access
- Reinforce edges of openings with strong stones
Ensuring Stability And Durability
Use strong mortar and proper stone placement for a stable base. Avoid gaps that can weaken the structure.
Check the base often during building. Fix any loose stones or cracks immediately to keep the structure safe.
- Build on a solid, level concrete footing
- Use quality mortar suitable for outdoor use
- Place heavier stones at the bottom
- Seal the stone to protect from weather
Installing The Grill
Installing a grill in your stone outdoor kitchen is an important step. It makes your cooking area functional and safe.
This guide covers how to pick the grill, fit it into your stone structure, and connect gas or charcoal options.
Choosing The Right Grill Unit
Pick a grill that fits your cooking needs and space size. Check the grill’s size before buying it.
Think about fuel type, cooking area, and extra features like side burners or storage.
- Measure the space where the grill will go
- Decide between gas, charcoal, or electric grills
- Choose durable materials like stainless steel
- Look for grills with easy cleaning features
Fitting The Grill Into The Structure
Prepare the stone structure opening to fit your grill. The opening must be slightly larger than the grill’s dimensions.
Check that the grill rests firmly and sits level. Use shims if needed to adjust height or balance.
- Measure grill width, depth, and height
- Cut or build the stone opening with a 1-2 inch gap around the grill
- Place the grill into the opening carefully
- Secure the grill using the manufacturer’s brackets or supports
- Check for stability and levelness
Connecting Gas Or Charcoal Options
For gas grills, connect the gas supply safely. Use approved hoses and fittings. Check for leaks after connection.
Charcoal grills do not need gas connections. Make sure the grill has good airflow and ash removal options.
- Turn off all gas valves before starting
- Attach the gas hose to the grill and gas source
- Use soap water to test connections for leaks
- For charcoal, arrange vents for proper airflow
- Keep a fire extinguisher nearby for safety
Adding Countertops And Shelving
Adding countertops and shelving makes your stone outdoor kitchen grill more functional. These elements help with food prep and storage. Choose materials and designs that fit your space and needs.
Good countertops and shelves keep your tools handy. They also add style to your outdoor kitchen. Let’s look at how to select and install them.
Selecting Countertop Materials
Pick countertop materials that resist heat and weather. Stone, concrete, and stainless steel work well outdoors. Think about how much maintenance each needs before you choose.
- Granite: Durable and heat-resistant
- Concrete: Can be molded to fit your space
- Tile: Offers many design options but needs sealing
- Stainless steel: Easy to clean and modern-looking
Installing Shelves For Utensils And Storage
Shelves keep your grill tools and supplies close. You can add open shelves or cabinets depending on your needs. Make sure shelves are strong and weatherproof.
| Type | Material | Best Use |
| Open Shelf | Wood or Metal | Easy access to utensils |
| Cabinet Shelf | Weatherproof Wood | Secure storage for supplies |
| Hooks | Metal | Hang grilling tools |
Finishing Touches
Add finishing touches like sealants and trims. Seal countertops to protect from stains and weather. Use trim to cover edges and give a clean look.
Tip:Use outdoor-rated sealants and finishes. They help your kitchen last longer and look great.
Safety And Maintenance Tips
Building a stone outdoor kitchen grill is a great choice for durability. Keeping it safe and well-maintained helps it last longer. Follow simple tips to protect your investment and enjoy cooking outdoors.
This guide covers fire safety, cleaning, sealing, and seasonal care. Each part helps keep your stone grill safe and looking good all year.
Fire Safety Precautions
Fire safety is very important when using a stone outdoor kitchen grill. Make sure to follow rules to prevent accidents and damage.
- Keep a fire extinguisher nearby in case of emergencies.
- Clear away dry leaves and debris around the grill area.
- Do not leave the grill unattended while cooking.
- Use long-handled tools to avoid burns.
- Make sure the grill is fully cooled before covering or cleaning.
Cleaning And Sealing Stone Surfaces
Regular cleaning and sealing protect stone surfaces from stains and cracks. Use mild cleaners and sealants made for natural stone.
| Cleaning Task | Recommended Method |
| Daily Wipe Down | Use a soft cloth with warm water and mild soap |
| Removing Grease | Apply stone-safe degreaser and rinse well |
| Sealing | Apply a stone sealant once every 1-2 years |
| Avoid | Harsh chemicals or acidic cleaners like vinegar |
Seasonal Care For Longevity
Seasonal care prevents damage from weather changes. Prepare your stone grill for cold, heat, and moisture.
- Cover the grill with a waterproof cover during rain or snow.
- Check for cracks or loose stones before winter.
- Remove ashes and debris after each use to avoid moisture buildup.
- Store tools and accessories indoors when not in use.
Credit: genstone.com
Frequently Asked Questions
What Materials Are Best For A Stone Grill?
Natural stones like granite, limestone, or flagstone are ideal for outdoor grills. They’re durable, heat-resistant, and add aesthetic appeal. Choose stones that match your outdoor space. Ensure they are properly sealed to withstand weather conditions. This ensures longevity and enhances your grill’s functionality.
How Do You Start Building A Stone Grill?
Begin with planning your design and layout. Gather necessary materials and tools. Prepare the foundation by leveling the ground. Lay stones carefully, ensuring they are aligned. Use mortar to secure them in place. Finally, install the grill components and test functionality.
What Is The Cost Of Building A Stone Grill?
The cost varies based on materials and design complexity. Typically, a DIY stone grill ranges from $1,000 to $5,000. Using premium stones increases expenses. Labor costs are reduced if you build it yourself. Always budget for unexpected expenses that may arise during construction.
How Long Does It Take To Build?
Building a stone outdoor kitchen grill typically takes 2 to 4 weeks. Time depends on design complexity and availability of materials. DIY projects might take longer due to learning curves. Plan each stage carefully to avoid delays. Having all materials ready speeds up the process.
Conclusion
Building a stone outdoor kitchen grill takes time and care. Choose strong stones and plan your design well. Work step-by-step to create a sturdy, safe cooking space. This kitchen adds value and joy to your home. Enjoy cooking outside with family and friends.
Keep your grill clean and check it often. A simple project that brings great rewards. Ready to start? Your perfect outdoor kitchen awaits.