

Are you struggling to get the perfect slice every time with your heavy duty slicer? Whether you’re prepping meats, cheeses, or vegetables, adjusting the thickness just right can make all the difference in taste and presentation.
But if you’re unsure how to control this crucial setting, you might waste time and ingredients. In this guide, you’ll discover simple, step-by-step tips to master thickness adjustment on your slicer. By the end, you’ll slice like a pro—saving time, reducing waste, and impressing everyone with perfectly cut pieces every single time.
Keep reading to unlock the full potential of your heavy duty slicer!
Choosing The Right Slicer
Heavy duty slicers come in manualand electricmodels. Manual slicers need you to push the blade. Electric slicers use a motor to cut. Electric models save time and effort. Manual slicers give more control over thickness.
Key features for heavy duty use include:
- Strong motorfor fast slicing
- Thick, sharp bladesto cut tough items
- Adjustable thickness dialfor precise cuts
- Sturdy buildfor long-lasting use
- Safety guardsto protect hands
Preparing Your Slicer
Keep the slicer clean for better performance. Wash all parts with warm, soapy water. Dry each part completely before putting it back. Avoid soaking electrical parts in water. Use a soft brush for hard-to-reach places. Check the slicer for any food bits stuck inside. This helps prevent rust and wear.
Inspect the blade before using the slicer. A dull blade makes slicing hard and uneven. Look for any nicks or damage on the blade. Replace the blade if it is damaged. Sharp blades are safer and more efficient. Regular checks help keep the slicer in top shape.
Adjusting Thickness Settings
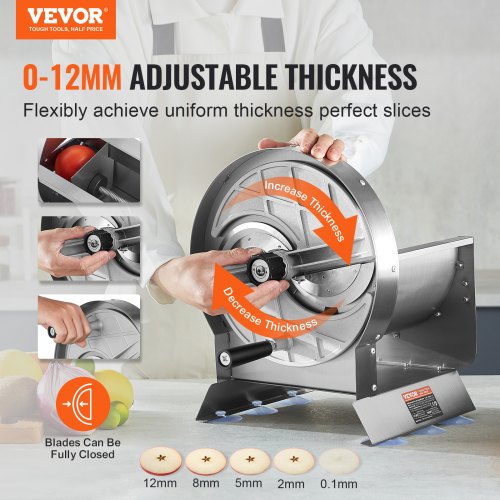
The thickness dialis usually located on the side or front of the heavy duty slicer. It looks like a round knob with numbers or lines showing different thickness levels. This dial controls how thick or thin the slices will be.
To adjust the thickness, first make sure the slicer is turned off. Then, gently turn the thickness dial to the desired setting. The lower numbers give thinner slices, while higher numbers give thicker slices.
After setting the dial, turn the slicer on and test it by slicing a small piece of food. Check the slice thickness and adjust the dial again if needed. Always turn off the slicer before making changes to avoid accidents.
Credit: www.vevor.ca
Tips For Consistent Slices
Using food holders keeps your hands safe and the slices even. Always place the food firmly inside the holder. This stops the food from moving while slicing. Make sure the holder is clean before use to avoid slipping.
Control the slicer’s speed to get the best results. Slower speeds give you more control for thin slices. Faster speeds work well for thick slices. Adjust the pressure gently; too much pressure can crush the food. Too little pressure may cause uneven slices.
Troubleshooting Common Issues
Uneven slicesoften happen because the blade is dull or dirty. Cleaning the blade regularly helps keep slices smooth. Check the thickness dial and make sure it is set correctly. Adjust it slowly to find the right thickness. Make sure the food is placed flat and steady on the slicer. Uneven pressure can cause slices to be different sizes.
Blade jammingcan stop the slicer from working well. Remove any stuck food pieces carefully. Check for hard bits like bones or seeds that can block the blade. Make sure the blade is sharp and not bent. Lubricate moving parts to keep them moving smoothly. Avoid forcing the slicer if it feels stuck.
Credit: www.vevor.ca
Safety Precautions
Always use both hands to hold the heavy duty slicer firmly. Avoid rushing while adjusting the thickness; slow and steady is safer. Keep fingers away from the blade area at all times. Use the handle or knob designed for thickness adjustments.
Safety guards are essential for protecting your hands and fingers. Never remove or bypass these guards. Make sure the guards are properly positioned before starting the slicer. Check guards regularly for damage or wear.
- Wear cut-resistant gloves for extra protection.
- Keep the slicer clean and dry to prevent slipping.
- Unplug the slicer before making any adjustments or cleaning.
Credit: www.vevor.ca
Frequently Asked Questions
How Do I Change The Thickness On A Heavy Duty Slicer?
To adjust thickness, locate the thickness dial or knob on your slicer. Turn it clockwise for thinner slices and counterclockwise for thicker ones. Always start with small adjustments and test slice to ensure desired thickness.
What Safety Tips Should I Follow When Adjusting Slicer Thickness?
Always unplug the slicer before adjusting thickness. Use the safety guard and avoid touching the blade directly. Wear cut-resistant gloves for extra protection. Follow the manufacturer’s instructions to prevent accidents.
Can I Adjust Thickness While Slicing Meat Or Cheese?
It’s best to stop slicing before adjusting thickness. Changing settings mid-slice can cause uneven cuts and damage the slicer. Resume slicing only after setting the desired thickness and securing the food properly.
How Often Should I Calibrate Thickness On A Heavy Duty Slicer?
Calibrate thickness regularly, especially if slices appear uneven. Calibration depends on slicer usage frequency. Check manufacturer guidelines and perform calibration monthly for optimal slicing performance.
Conclusion
Adjusting the thickness on a heavy duty slicer is simple with practice. Always turn the dial slowly to find the perfect slice. Keep safety in mind while making adjustments. Clean the slicer after use to maintain its performance. Regular checks help avoid uneven cuts and machine issues.
With these tips, slicing becomes easier and more precise every time. Try different thicknesses to suit your needs. Enjoy better results and less waste with proper adjustments.