
Are you ready to take your outdoor cooking to the next level? Adding a side burner to your built-in grill can give you the extra space and versatility you need to prepare side dishes, sauces, or even boil water without leaving the grill.
Imagine effortlessly cooking an entire meal in one spot, impressing your guests with perfectly grilled main courses and delicious sides made right next to each other. If you’ve ever wondered how to make this upgrade happen, you’re in the right place.
Keep reading, and you’ll discover simple, step-by-step tips to add a side burner to your built-in grill quickly and safely. Your backyard cooking game is about to get a serious boost!
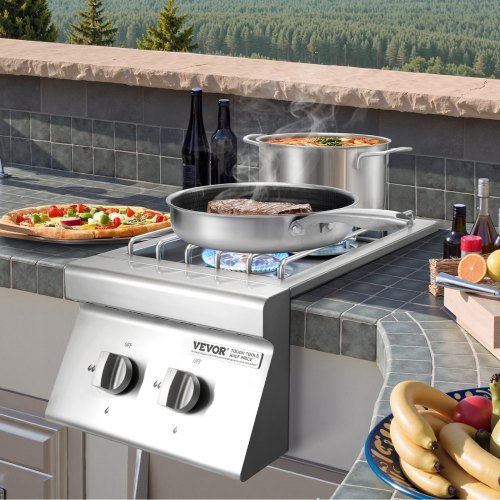
Credit: www.vevor.ca
Choosing The Right Side Burner
Adding a side burner to your built-in grill gives you more cooking options. It lets you prepare sauces, boil water, or cook side dishes.
Choosing the right side burner is important for safety and convenience. You need to think about the type, compatibility, and fuel source.
Types Of Side Burners
There are several types of side burners. Each type has its own use and features to consider.
- Single Burner: A simple burner for boiling or frying small items.
- Double Burner: Offers more cooking space and heat control.
- Infrared Burner: Provides very high heat for searing meats quickly.
- Griddle Burner: Flat surface for cooking pancakes or eggs.
Pick the type that fits your cooking style and space available.
Compatibility With Built-in Grills
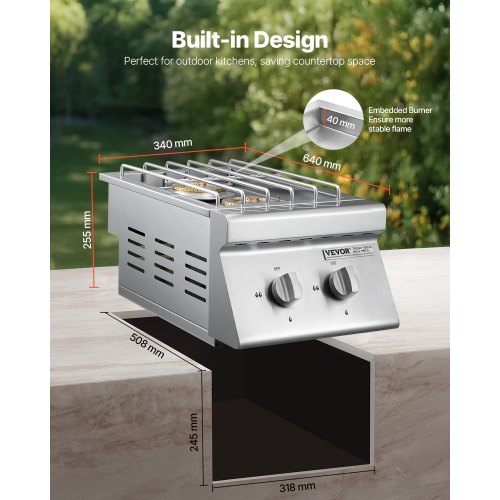
Not all side burners fit every built-in grill. Check the size and design first.
Some grills have specific models made for them. Others need custom installation or adapters.
- Measure the space next to your grill carefully.
- Look for side burners designed for your grill brand.
- Check if the burner needs special mounting parts.
- Ensure the gas connection matches your grill’s setup.
Fuel Options And Efficiency
Side burners use different fuels. Common options include propane, natural gas, and electric.
Each fuel type has benefits and costs to consider for efficiency and convenience.
| Fuel Type | Advantages | Considerations |
|---|---|---|
| Propane | Portable and easy to connect | Needs regular tank refills |
| Natural Gas | Continuous fuel supply, cost-effective | Requires home gas line connection |
| Electric | Clean and easy to use | Needs nearby power outlet |
Choose the fuel type that matches your grill setup and cooking habits.
Gathering Tools And Materials
Adding a side burner to your built-in grill needs the right tools and materials. Getting them ready helps the work go smoothly.
Before starting, gather everything you need. This saves time and keeps the project safe.
Essential Tools Checklist
You need some basic tools to add a side burner. These tools help you cut, fit, and install the burner properly.
- Drill with drill bits
- Screwdrivers (Phillips and flathead)
- Measuring tape
- Adjustable wrench
- Level
- Jigsaw or hole saw
- Wire stripper (if wiring is needed)
- Marker or pencil
- Socket set
- Safety gloves
Safety Gear To Use
Wearing safety gear protects you from injury during installation. Always use the right gear for your tools and task.
- Safety goggles to protect your eyes
- Work gloves to protect your hands
- Long sleeves to shield your arms
- Dust mask if cutting materials
- Closed-toe shoes for foot safety
Preparing The Grill Area
Adding a side burner to your built-in grill makes cooking easier. First, you must prepare the grill area well. This helps ensure a safe and smooth installation.
Proper preparation also keeps your grill in good shape. Follow these steps before you start installing the side burner.
Selecting The Installation Spot
Choose a spot next to your grill that has enough space. The side burner should fit without blocking grill access.
Make sure the location has good ventilation. Avoid placing the burner where wind can blow flames or smoke toward people.
- Check that the spot is level and sturdy
- Keep the burner away from flammable materials
- Leave room to open lids and doors easily
- Consider access to gas supply lines
Clearing And Cleaning The Surface
Clear the chosen area of any objects. Remove grills, covers, or tools that could block installation.
Clean the surface to remove dirt, grease, and debris. A clean surface helps the burner fit tightly and safely.
- Use a brush to remove loose dirt
- Wipe the area with warm soapy water
- Dry the surface completely before starting
- Check for rust or damage and fix if needed
Installing The Side Burner
Adding a side burner to your built-in grill expands your cooking options. This guide helps you install the side burner safely and correctly.
Follow the steps carefully to cut the countertop, mount the burner, and secure it firmly for best results.
Cutting The Countertop Opening
Measure the side burner’s dimensions before cutting. Mark the countertop where the burner will fit. Use a jigsaw to cut along the marked lines. Smooth the edges with sandpaper to avoid splinters.
Make sure the opening is clean and fits the burner snugly. Check for any obstacles under the countertop before cutting.
Mounting The Burner Unit
Place the burner into the cut opening carefully. Align it so the control knobs are easy to reach. Check that the burner sits level to ensure even cooking.
- Connect the gas supply hose to the burner’s gas inlet.
- Use plumber’s tape to seal the connection and prevent leaks.
- Test the connection for leaks with soapy water.
- Adjust the burner to fit flush with the countertop.
Securing With Screws And Brackets
Use the mounting brackets that came with the burner. Attach the brackets under the countertop around the burner’s edges.
| Tool | Purpose |
|---|---|
| Drill | Make pilot holes for screws |
| Screwdriver | Tighten screws into brackets |
| Level | Ensure burner is even |
| Wrench | Tighten gas connections |
Tighten all screws securely. Check the burner’s stability and make sure it does not move. Confirm that gas connections remain leak-free after securing.
Connecting Gas Supply
Adding a side burner to your built-in grill needs a safe gas connection. You must follow correct steps to avoid gas leaks or accidents.
This guide shows how to connect the gas supply properly. Focus on safety and accuracy for the best results.
Turning Off The Main Gas
Before working on any gas line, always turn off the main gas supply. This stops gas flow and lowers risk of fire.
Locate the main valve near your grill or gas tank. Turn it clockwise to close it tightly.
- Find the main gas valve
- Turn valve clockwise to shut off
- Confirm gas flow has stopped
Attaching Gas Lines Safely
Use the correct gas hose and fittings for your side burner. Check that all parts match the grill’s gas type.
Securely connect the hose to both the burner and the gas source. Tighten all connections with a wrench but do not over-tighten.
- Choose the right hose and fittings
- Connect hose to burner and gas supply
- Tighten connections with a wrench
- Do not force fittings to avoid damage
Checking For Leaks
After connecting, check all gas lines for leaks. Use a soap and water mixture and apply it to each joint.
Bubbles forming at connections mean gas is escaping. Tighten fittings if you see bubbles, then test again.
- Mix soap and water in a spray bottle
- Spray solution on all gas connections
- Look for bubbles indicating leaks
- Tighten connections if bubbles appear
- Repeat test until no bubbles show
Credit: grillio.com
Testing The Side Burner
Testing the side burner on your built-in grill ensures it works safely and efficiently. This guide covers how to light it, adjust the flame, and fix common problems.
Check your burner after installation to avoid any gas leaks or ignition failures. Follow these simple steps for a smooth start.
Ignition Process
Start by opening the gas valve for the side burner. Press the ignition button while turning the control knob to the light position. You should hear a clicking sound and see a flame.
If the burner does not light, wait a few seconds before trying again. Always make sure the gas supply is on and the connections are tight.
Adjusting Flame Levels
After lighting the burner, adjust the flame to the desired height. Turn the control knob slowly to increase or decrease the flame size.
- A low flame saves fuel and is good for simmering.
- A medium flame works well for most cooking tasks.
- A high flame is best for boiling or searing food quickly.
Troubleshooting Common Issues
| Issue | Cause | Solution |
| No ignition | Empty gas tank or loose connection | Check gas supply and tighten connections |
| Weak flame | Clogged burner ports | Clean burner with a brush or compressed air |
| Flame goes out | Wind or low gas pressure | Shield burner from wind or check regulator |
Maintenance Tips
Adding a side burner to your built-in grill is great for cooking variety. Keeping it in good shape helps it last longer. Regular maintenance prevents problems and keeps it safe.
Follow simple steps to care for your side burner. Clean it often, check safety parts, and protect it from weather damage.
Cleaning The Burner
Clean the burner after every use to remove food and grease. This stops clogs and keeps flames even. Use a soft brush or cloth to clean the surface.
Remove burner parts carefully and wash with warm, soapy water. Let them dry fully before putting back. Avoid harsh chemicals that can damage metal.
- Brush burner tubes gently to clear holes
- Wipe burner surface after cooking
- Check for rust and clean it immediately
Regular Safety Checks
Check your side burner regularly for leaks or damage. Look at gas connections and hoses for cracks or wear. Replace parts if you find any problems.
Test the ignition system often. Make sure sparks light the burner quickly. Turn off gas supply when not in use to avoid accidents.
- Inspect gas hose for cracks or holes
- Check burner flame color for proper burning
- Test ignition before cooking
- Turn off gas after use
Protecting From Weather
Keep your side burner safe from rain, snow, and sun. Use a grill cover that fits well. This prevents rust and weather damage.
Store the side burner in a dry place during winter or bad weather. Remove any leftover food or grease before covering to avoid bad smells and pests.
- Use a waterproof grill cover
- Store burner indoors or in a shed if possible
- Clean before storing for long periods
Credit: grillio.com
Enhancing Your Bbq Setup
Adding a side burner to your built-in grill improves your outdoor cooking space. It gives you extra cooking options and makes grilling easier.
This upgrade helps you cook side dishes, sauces, or boil water while grilling. It creates a more flexible BBQ experience.
Adding Accessories
Side burners are a great accessory for your built-in grill. They expand your cooking area without needing a separate stove.
Choose a side burner that fits your grill size and fuel type. Some models use propane, while others match your grill’s gas supply.
- Check compatibility with your built-in grill
- Consider burner size and heat output
- Look for stainless steel for durability
- Choose easy-to-clean surfaces
- Ensure a secure installation
Creating A Functional Outdoor Kitchen
Adding a side burner helps turn your grill into a full outdoor kitchen. It lets you cook many dishes at once in one area.
Plan your outdoor kitchen layout to include space for the side burner, prep areas, and storage. This makes cooking smooth and fun.
- Place the side burner near the main grill
- Add counter space for food preparation
- Include storage for utensils and spices
- Use weatherproof materials for outdoor use
- Install good lighting for evening cooking
Frequently Asked Questions
Can I Add A Side Burner To Any Grill?
Yes, you can add a side burner to most built-in grills. Ensure compatibility with your grill’s design. Check if there’s enough space and the appropriate connections available. Follow the manufacturer’s instructions for installation. This addition enhances your grilling experience by providing extra cooking options.
What Tools Are Needed For Installation?
For installing a side burner, you’ll need basic tools. These include a screwdriver, adjustable wrench, and drill. You might also require a level and a tape measure. Ensure you have the right tools to make the installation process smoother and more efficient.
Is Professional Installation Recommended?
Professional installation is recommended for those unfamiliar with grill modifications. Experts ensure a safe and correct setup. However, if you’re handy with tools, you can follow the manufacturer’s guide. Proper installation guarantees optimal performance and safety while using the side burner.
How Does A Side Burner Enhance Grilling?
A side burner offers additional cooking options. You can prepare sauces, side dishes, or boil water while grilling. It saves time and provides convenience. This feature transforms your grill into a versatile outdoor kitchen, enhancing your overall cooking experience.
Conclusion
Adding a side burner to your built-in grill boosts cooking options and convenience. It lets you prepare sauces or side dishes right next to the main grill. You can enjoy easier meal prep and serve food faster. Just follow the steps carefully for a safe and sturdy setup.
A side burner makes outdoor cooking more fun and flexible. Try it out to enhance your grilling experience today.