

If you use a multi-purpose slicer often, you know how important a sharp blade is for smooth, precise cuts. But when your blade gets dull or damaged, it can slow you down and make your slicing frustrating.
You might feel unsure about how to replace it safely and correctly. This guide will walk you through each simple step so you can swap out your blade quickly and get back to slicing like a pro. Keep reading, and you’ll master blade replacement in no time—saving yourself hassle and keeping your slicer working at its best.
Tools Needed
- Screwdriver:Usually a flathead or Phillips type.
- Replacement blade:Make sure it fits your slicer model.
- Protective gloves:To avoid cuts while handling the blade.
- Cleaning cloth:For wiping the slicer before and after replacement.
- Small container:To hold screws and small parts safely.
Having these tools ready makes the blade replacement smooth and safe. Always check the blade size before starting. Gloves protect your hands from sharp edges. Keep screws in a container to avoid losing them.
Safety Precautions
Keep your fingers away from the blade. It is very sharp. Always turn off and unplug the slicer before touching the blade. Wear safety gloves to protect your hands. Place the slicer on a stable surface to prevent it from tipping over. Ensure the area is well-lit so you can see clearly.
Use a clean cloth to remove any debris around the blade. Make sure to handle the blade by its edges. Store the blade safely when not in use. Keep children and pets away while you work. Always read the slicer’s manual for specific safety tips.
Removing The Old Blade
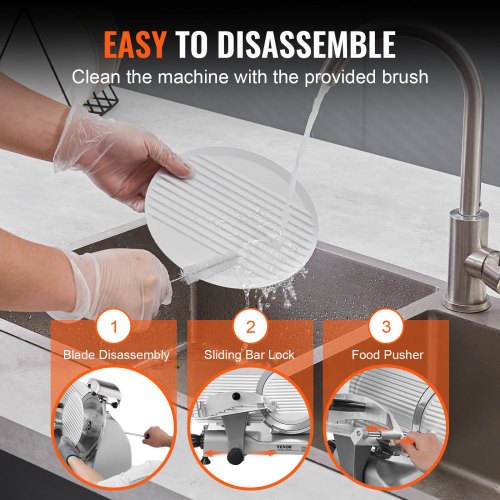
To remove the old blade, first make sure the slicer is unplugged. Safety is very important. Find the locking mechanismthat holds the blade. This can be a knob, lever, or button depending on your slicer model. Turn or press it gently to release the blade.
Once the slicer is unlocked, carefully lift the blade awayfrom the device. Use a cloth or gloves to avoid cutting your hands. The blade may be sharp and can cause injury. Set the old blade aside in a safe place for disposal or recycling.
Credit: support.bradyid.com
Choosing The Right Replacement Blade
Choosing the right replacement blade is key for your multi-purpose slicer. Blades come in different shapes and sizes. Each blade suits a specific task like slicing, shredding, or grating. Make sure the blade fits your slicer’s model. Check the blade’s material. Stainless steel blades last longer and stay sharp. Plastic blades are safer but less durable. Consider the blade’s thickness. Thin blades cut smoothly, while thicker ones handle tough foods. Look for blades that are easy to clean and dishwasher safe.
Using the correct blade improves safety and cutting quality. Avoid using a wrong or dull blade to prevent accidents.
Installing The New Blade
Place the new blade carefully on the slicer. Make sure the holes on the blade line up with the pins on the slicer. This helps the blade sit correctly and prevents it from moving.
Check that the blade edges face the right direction. The sharp side should point outward to cut properly. A misaligned blade can cause poor slicing or damage.
- Use the screws or clips to hold the blade firmly.
- Tighten the screws evenly to avoid wobbling.
- Do not overtighten; it can break the blade or slicer parts.
- Make sure the blade does not move after securing.
Credit: www.vevor.ca
Testing The Slicer
Test the slicer carefully after blade replacement. Make sure the blade fits tightly and does not wobble. Use a soft vegetable or fruit to check slicing quality. The slices should be even and smooth without tearing.
Check for any unusual noise or resistance while slicing. The slicer should work smoothly and quietly. If the blade feels loose or cuts unevenly, recheck the installation. Safety first: always keep hands away from the blade during testing.
- Use a firm but soft food item for testing
- Ensure slices are uniform and clean
- Listen for strange sounds or grinding
- Stop immediately if blade moves unexpectedly
- Wear safety gloves if needed
Maintenance Tips
Cleaning the blade is very important for safe use and long life.
Always unplug the slicer before cleaning the blade.
Use a soft cloth or brush to remove food bits gently.
Warm, soapy water helps remove grease and dirt well.
Never soak the blade for a long time to avoid rust.
Dry the blade completely before putting it back in place.
Proper storage keeps the slicer and blade safe and sharp.
- Store the slicer in a dry place to stop rust.
- Use the blade cover or guard if your slicer has one.
- Keep the slicer out of reach of children.
- Make sure the slicer is clean and dry before storing.

Credit: www.patchworkposse.com
Frequently Asked Questions
How Do I Safely Remove The Old Blade?
To remove the old blade safely, unplug the slicer first. Use gloves to protect your hands. Unscrew or unlock the blade mechanism carefully. Avoid touching the sharp edges directly to prevent injury.
What Tools Are Needed To Replace The Blade?
You typically need a screwdriver or Allen wrench. Some slicers include a blade removal tool. Always check your slicer’s manual for specific tools required. Having gloves is recommended for safety during replacement.
How Often Should I Replace The Slicer Blade?
Replace the blade when it becomes dull or damaged. Regular use may require replacement every 6 to 12 months. Frequent blade changes keep slicing efficient and safe. Inspect the blade regularly for any signs of wear.
Can I Use Any Blade For My Multi-purpose Slicer?
No, use only blades designed for your specific slicer model. Using the wrong blade can damage the machine and reduce performance. Always buy manufacturer-approved replacement blades for best results.
Conclusion
Replacing the blade on your multi-purpose slicer keeps it sharp and safe. Follow the steps carefully for best results. Use the right tools and handle the blade with care. Regular blade changes help your slicer work smoothly every time. A sharp blade makes slicing easier and more precise.
Keep your kitchen tools in good shape to enjoy cooking more. Simple maintenance can save you money and effort in the long run. Stay safe and take your time while replacing the blade.