

Are you ready to take your outdoor cooking to the next level? Installing a built-in grill can transform your backyard into a chef’s paradise, making every meal an unforgettable experience.
But where do you start? Don’t worry—this guide will walk you through each step, making the process simple and stress-free. By the end, you’ll have the confidence to set up your grill perfectly and enjoy delicious barbecues all year round.
Keep reading to discover how easy it is to install your own built-in grill and turn your outdoor space into the ultimate cooking spot.
Choosing The Right Location
Installing a built-in grill needs careful thought about where to place it. The right location helps you use the grill safely and easily.
Think about space, air flow, and access to power or gas. These factors make cooking easier and safer.
Assessing Space Requirements
Choose a spot with enough room for the grill and for people to move around. Leave space for opening lids and doors.
Consider nearby furniture and walking paths. Avoid tight corners or crowded areas to keep the space comfortable.
- Allow at least 3 feet of clearance on all sides
- Keep enough room for cooking tools and prep space
- Plan space for seating and serving areas nearby
Considering Ventilation And Safety
Good airflow is important to avoid smoke buildup and reduce fire risks. Place the grill where smoke can easily escape.
Keep the grill away from walls, overhangs, and plants. Avoid spots near windows or doors to stop smoke from entering your home.
- Set the grill at least 10 feet from structures
- Do not install under low ceilings or eaves
- Keep flammable materials far from the grill
Planning For Utilities Access
The grill needs easy access to gas, electricity, or propane. Plan the location near these utilities to avoid extra work.
Check local codes for safety rules about utility connections. Make sure the setup is safe and convenient for use.
- Locate near a gas line or propane tank if needed
- Plan for electrical outlets for lights or accessories
- Ensure water access if you want a sink nearby
Gathering Necessary Tools And Materials
Installing a built-in grill requires the right tools and materials. Preparing them before starting saves time and effort.
Carefully collect everything you need to ensure a smooth installation process. This guide helps you identify essential items.
Essential Tools Checklist
You need specific tools to install your grill safely and correctly. Having these tools ready helps avoid delays.
- Measuring tape for accurate dimensions
- Power drill with drill bits
- Screwdrivers (flathead and Phillips)
- Adjustable wrench for tightening bolts
- Level to ensure the grill is even
- Jigsaw or reciprocating saw for cutting countertop
- Protective gloves and safety goggles
- Caulking gun for sealant application
Materials And Grill Components
Besides tools, gather all grill parts and installation materials. Check each item carefully before you begin.
| Item | Description | Quantity |
|---|---|---|
| Built-in grill unit | Main cooking appliance with burners | 1 |
| Grill cabinet or enclosure | Frame to hold the grill securely | 1 |
| Gas supply line | Connects grill to fuel source | As needed |
| Mounting brackets and screws | Hardware to fix grill in place | Varies by model |
| Heat-resistant sealant | Prevents air and moisture leaks | 1 tube |
| Drip tray | Catches grease and food drippings | 1 |
| Ignition system components | Parts to start the grill safely | Included with grill |
Preparing The Installation Site
Installing a built-in grill needs a well-prepared site. This ensures the grill fits safely and works well.
Careful preparation helps avoid problems during and after installation. Follow these steps for a smooth process.
Measuring And Marking
Start by measuring the space where the grill will go. Use a tape measure to get exact dimensions.
Mark the area clearly on the countertop with a pencil. This shows where you will cut.
- Measure the grill width, depth, and height
- Mark the cut lines carefully on the countertop
- Double-check measurements before cutting
Cutting The Countertop
Cut the countertop along the marked lines. Use a saw that fits your countertop material.
Wear safety gear like goggles and gloves to protect yourself while cutting.
- Use a jigsaw for wood or laminate countertops
- Use a circular saw with a diamond blade for stone
- Cut slowly to avoid damaging the countertop
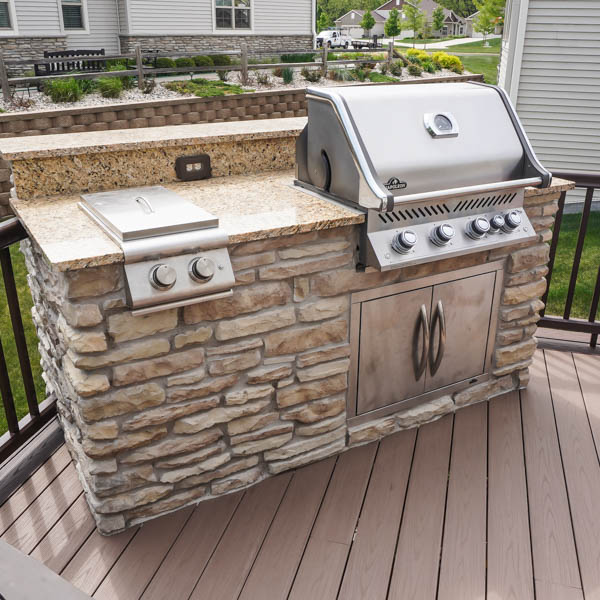
Ensuring Proper Support
Check that the area under the cutout can hold the grill’s weight. The grill needs strong support.
Add extra framing if the support is weak. Use wood or metal braces as needed.
- Inspect the cabinet or base structure
- Add braces or supports if needed
- Make sure the grill sits level and stable
Credit: www.burlingtonfireplace.com
Installing The Grill Unit
Installing a built-in grill is a great way to upgrade your outdoor kitchen. Proper installation ensures safety and efficiency.
This guide focuses on positioning the grill, securing it, and connecting the gas or electrical lines.
Positioning The Grill
Choose a spot that fits the grill size and allows good airflow. Make sure the area is level and sturdy.
Leave enough space around the grill for safe use and maintenance access.
Securing The Grill In Place
Secure the grill to prevent movement during use. Use the bolts and brackets included with your grill.
- Place the grill in the cutout area.
- Align mounting holes with the frame.
- Insert bolts through the holes.
- Tighten bolts firmly but avoid over-tightening.
- Check the grill is stable and level.
Connecting Gas Or Electrical Lines
Connect the grill to the power source following safety rules. Use a licensed professional if unsure.
| Connection Type | Key Steps | Safety Tips |
|---|---|---|
| Gas | Attach hose, check for leaks, tighten fittings | Use soapy water to test leaks, turn off gas if detected |
| Electric | Connect power cord, secure wiring, test power | Turn off circuit breaker before wiring, use waterproof connectors |
Testing And Adjustments
After installing your built-in grill, testing and adjusting it is important. This ensures safety and proper performance. Take time to check for leaks and set the controls correctly.
Following these steps helps your grill work well and keeps you safe while cooking outdoors.
Checking For Leaks And Safety
Before using the grill, check all gas connections for leaks. Use a soap and water solution and apply it to the connections. Watch for bubbles, which show a leak. Fix any leaks before lighting the grill.
- Turn off the gas supply.
- Mix soap and water in a spray bottle.
- Spray the solution on all gas fittings and hoses.
- Look closely for bubbles forming.
- If bubbles appear, tighten or replace the parts.
- Repeat the test until no bubbles form.
Calibrating Temperature Controls
Set the temperature controls to get the right heat for cooking. Use a grill thermometer to check the actual temperature inside the grill. Adjust the control knobs to match the desired temperature.
| Control Setting | Approximate Temperature |
| Low | 250°F (121°C) |
| Medium | 350°F (177°C) |
| High | 450°F (232°C) |
Test the grill for several minutes at each setting. This helps you understand how your grill heats at different controls. Adjust as needed for your cooking style.
Finishing Touches
After installing your built-in grill, the final steps help protect it. These steps also improve its look and functionality.
Focus on sealing and weatherproofing first. Then, add accessories and features to enhance your grilling experience.
Sealing And Weatherproofing
Seal all gaps around the grill with high-quality silicone caulk. This keeps water and pests out of the enclosure.
Use weatherproof covers designed for built-in grills. Covers protect from rain, dust, and UV rays when the grill is not in use.
- Apply silicone sealant around edges and joints
- Check for gaps or cracks and fill them
- Choose a grill cover that fits your grill’s size
- Store the grill cover in a dry place when not used
Adding Accessories And Features
Adding useful accessories improves your cooking setup. Features like side shelves and tool hooks keep everything handy.
| Accessory | Purpose | Installation Tips |
| Side Shelves | Extra workspace | Attach firmly to grill frame |
| Tool Hooks | Hold grilling tools | Place near grill for easy reach |
| Lighting | Grill in low light | Use waterproof fixtures |
| Storage Drawers | Store utensils and supplies | Install under the grill |
Maintenance Tips
Keeping your built-in grill in top shape needs regular care. Proper maintenance helps your grill last longer and cook better.
Below are some simple tips for cleaning and fixing common problems with your grill.
Regular Cleaning Routine
Cleaning your grill often stops grease buildup and keeps food tasting fresh. Follow these easy steps to clean your grill safely.
- Turn off the gas and let the grill cool completely.
- Remove and clean the grates using a grill brush and warm soapy water.
- Empty the drip tray and wash it with dish soap.
- Wipe the exterior with a damp cloth to remove dirt and dust.
- Check the burners for blockages and clean with a soft brush.
- Cover the grill after cleaning to protect it from weather.
Troubleshooting Common Issues
If your grill does not light or heats unevenly, try these fixes before calling for help.
| Problem | Possible Cause | How to Fix |
| Grill won’t light | Empty propane tank | Replace or refill the tank |
| Uneven heat | Clogged burner ports | Clean burners with a brush |
| Gas smell | Loose connection | Check and tighten gas fittings |
| Igniter not working | Dead battery or faulty spark | Replace battery or igniter |
Credit: www.familyhandyman.com

Credit: m.youtube.com
Frequently Asked Questions
How Do I Start Installing A Built-in Grill?
Begin by selecting a suitable location with adequate ventilation. Ensure you have all necessary tools and materials ready. Follow the manufacturer’s instructions carefully, focusing on safety. Consider hiring a professional if unsure. Proper installation ensures efficient grilling and safety.
What Materials Are Needed For Grill Installation?
You’ll need the grill unit, a sturdy base, and installation tools like a drill and wrench. Ensure you have fuel connections, such as gas lines, and safety equipment. Check for any specific materials recommended by the grill manufacturer. Quality materials ensure durability and safety.
Can I Install A Grill On My Own?
Yes, it’s possible if you’re handy with tools and follow instructions closely. However, professional help is advisable for complex gas connections or electrical work. Ensure you follow safety guidelines throughout. Proper installation enhances performance and longevity.
How Long Does Grill Installation Take?
Installation time varies based on complexity and experience. Typically, it can take a few hours to a day. Professional installations might be quicker. Factors include grill type, location preparation, and connection setup. Plan accordingly for a smooth installation process.
Conclusion
Installing a built-in grill can improve your outdoor cooking space. Follow the steps carefully for a safe setup. Choose the right spot with good ventilation and solid support. Use proper tools and materials for best results. Take your time and double-check connections before use.
Enjoy cooking outdoors with your new grill. It adds convenience and style to your backyard. Keep the grill clean and maintained for long life. Simple preparation leads to great grilling experiences every time.