
Are you ready to enjoy the convenience and power of a built-in grill fueled by natural gas? Connecting your natural gas line to your grill might seem tricky, but with the right steps, you can do it safely and confidently.
This guide is designed to walk you through the process in clear, simple terms. By the end, you’ll have the knowledge to set up your grill for endless backyard cookouts without the hassle. Keep reading to discover how to make your outdoor cooking setup smooth, secure, and ready to impress.

Credit: www.familyhandyman.com
Preparing For Connection
Connecting a natural gas line to a built-in grill requires careful preparation. This step is important for safety and proper function.
Before starting the connection, you must gather tools, check regulations, and turn off the gas supply. These actions help prevent accidents.
Gathering Required Tools And Materials
Collect all tools and materials before you begin. Having everything ready saves time and avoids interruptions.
- Pipe wrench
- Adjustable wrench
- Pipe thread sealant or gas-rated Teflon tape
- Flexible gas line or copper tubing
- Gas shut-off valve
- Leak detection solution or soapy water
- Safety gloves and goggles
Checking Local Codes And Permits
Local laws may require permits for gas line work. Check with your city or county before starting.
Follow all codes to ensure your installation is legal and safe. Some areas require inspections after installation.
- Contact local building department
- Ask about necessary permits
- Learn about inspection requirements
- Follow approved installation guidelines
Shutting Off The Gas Supply
Turn off the main gas supply before starting the connection. This step prevents gas leaks and accidents.
Locate the gas shut-off valve near your gas meter or grill. Make sure the valve is fully closed.
- Find the main gas valve
- Turn the valve clockwise to close
- Check that gas flow has stopped
- Use a gas detector or soapy water to confirm no leaks

Credit: www.angi.com
Inspecting The Grill And Gas Line
Connecting a natural gas line to a built-in grill needs care. You must check the grill and gas line first. This makes sure everything is safe and works well.
Inspecting helps find problems before you start. This saves time and avoids risks like gas leaks or fire.
Examining Grill Gas Inlet
Look at the grill’s gas inlet to see if it is clean and undamaged. The inlet is where the gas line connects to the grill.
Check for rust, cracks, or dirt. These can cause gas leaks or block gas flow. Make sure the inlet size matches your gas line fitting.
- Clean any dirt or debris around the inlet
- Look for signs of corrosion or damage
- Confirm the inlet size fits your gas line
- Replace damaged parts before connecting
Assessing Existing Gas Line Condition
Check the current gas line for wear or damage. Old or cracked pipes can cause leaks. Look for dents, holes, or loose fittings.
Make sure the gas line is the right type for natural gas and is rated for outdoor use. Confirm it is properly connected to the gas supply.
- Inspect the pipe for cracks and holes
- Check all connections for tightness
- Verify pipe type is suitable for natural gas
- Replace damaged or worn pipes and fittings
Ensuring Proper Ventilation
Good ventilation is important to prevent gas buildup. Make sure the grill area is open and air can flow freely around the grill.
Check that any nearby walls or structures do not block airflow. Proper ventilation reduces the risk of gas hazards and helps the grill work well.
- Keep the grill area open and free of obstructions
- Check that walls or fences do not block airflow
- Avoid enclosing the grill in tight spaces
- Allow fresh air to circulate around the grill
Choosing The Right Gas Line Components
Connecting a natural gas line to your built-in grill needs the right parts. Using proper components keeps your grill safe and working well.
Pick materials and fittings that match local codes and gas type. This guide covers pipe material, fittings, and thread sealant use.
Selecting Appropriate Pipe Material
Use pipe materials designed for natural gas. Common options include black steel, corrugated stainless steel tubing (CSST), and flexible gas connectors.
- Black steel pipe:Strong and durable; often used underground or inside walls.
- CSST:Flexible and easier to install; requires bonding to prevent lightning damage.
- Flexible gas connectors:Used to connect the gas line to the grill; should not be used as the main gas line.
Using Approved Fittings And Connectors
Only use fittings and connectors listed for natural gas use. Avoid mixing metals that can corrode or cause leaks.
| Fitting Type | Material | Use |
|---|---|---|
| Pipe Nipples | Black Steel | Connect sections of pipe |
| Brass Connectors | Brass | Join flexible connectors to hard pipe |
| Compression Fittings | Stainless Steel | Secure flexible tubing |
Applying Thread Sealant Correctly
Apply thread sealant or pipe dope to male threads before assembly. Use only sealants rated for natural gas.
- Clean threads to remove dirt and oil.
- Wrap Teflon tape clockwise around threads 2-3 times.
- Apply pipe dope evenly over Teflon tape if required.
- Do not let sealant enter the pipe to avoid clogs.
- Tighten fittings by hand, then use a wrench for a snug fit.

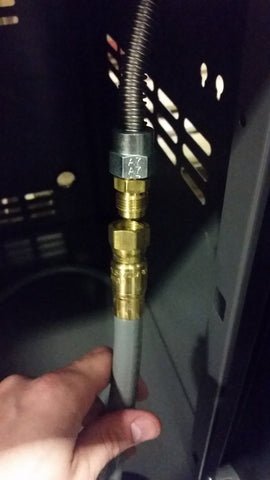
Credit: www.reddit.com
Connecting The Gas Line
Connecting a natural gas line to a built-in grill is a task that needs care and accuracy. You must handle the gas pipes and fittings carefully to ensure safety.
Follow clear steps to measure, cut, and attach the gas line correctly. This guide explains how to do it safely and securely.
Measuring And Cutting The Pipe
Measure the distance between your gas source and the grill carefully. Accurate measurement helps avoid leaks and loose connections.
Use a pipe cutter to cut the pipe cleanly. Make sure the cut is straight and smooth for a good fit.
- Measure twice to avoid mistakes
- Mark the pipe where you want to cut
- Use a pipe cutter, not a saw, for clean cuts
- Remove any burrs with a deburring tool
Attaching Connectors Securely
Attach connectors to the pipe ends tightly. Use pipe thread tape to prevent leaks at the joints.
Make sure the connectors are the right size and type for your pipes and grill fittings.
- Wrap pipe threads with gas-rated tape
- Hand-tighten first, then use a wrench
- Do not overtighten to avoid damage
- Check that connectors fit snugly without gaps
Connecting To Grill And Main Gas Supply
Connect the gas line to the main supply valve first. Make sure the valve is off before starting.
Attach the other end of the line to your built-in grill’s gas inlet. Tighten all connections firmly and check for leaks.
- Turn off the main gas supply valve
- Connect the gas line to the supply valve securely
- Attach the line to the grill’s gas inlet
- Use soapy water to test for leaks after connecting
- Never use an open flame to check for leaks
Testing For Leaks
Checking for gas leaks is important before using your built-in grill. It keeps you safe and prevents gas waste.
You can test for leaks with simple tools like soap water or a gas leak detector. Fix leaks right away if you find any.
Performing A Soap Solution Test
This test uses a soap and water mix to find gas leaks. Bubbles show where gas escapes.
- Mix one part liquid soap with three parts water in a spray bottle.
- Turn on the gas supply to the grill.
- Spray the soap solution on all gas connections and joints.
- Look closely for bubbles forming at any connection point.
- If you see bubbles, it means there is a gas leak.
- Turn off the gas supply immediately if leaks appear.
Using A Gas Leak Detector
A gas leak detector is a tool that senses gas in the air. It can find leaks quickly and safely.
Use the detector near all gas fittings and pipes. If it beeps or lights up, you have a leak.
| Action | Description |
|---|---|
| Power On | Turn on the gas leak detector before use. |
| Scan Area | Move the detector near grill connections slowly. |
| Detect Leak | Watch for alarms or visual signals from the detector. |
| Turn Off Gas | If a leak is detected, close the gas valve immediately. |
Addressing Any Detected Leaks
If you find a leak, do not use the grill. Fix the leak before proceeding.
- Turn off the gas supply at the main valve.
- Tighten loose connections with a wrench.
- Replace damaged hoses or fittings.
- Repeat the soap solution or detector test after repairs.
- If leaks remain, call a professional for help.
Final Safety Checks
After connecting the natural gas line to your built-in grill, safety is your top priority. Perform final checks before using the grill.
These checks help prevent accidents and ensure your grill works correctly.
Confirming Proper Flame And Operation
Turn on the grill and observe the flame. It should be blue and steady. A yellow or flickering flame means there is a problem.
- Light each burner one at a time.
- Check for even flames across all burners.
- Listen for unusual sounds like hissing.
- Adjust knobs to test flame response.
Checking For Gas Odors
Smell around the grill and gas line for any gas odor. Gas leaks can be dangerous and must be fixed immediately.
| Odor Type | Action Needed |
| Strong gas smell | Turn off gas, ventilate area, call professional |
| Faint gas smell | Check connections, tighten fittings |
| No gas smell | Safe to proceed |
Reviewing Emergency Shut-off Procedures
Know how to stop the gas flow quickly if there is a problem. The shut-off valve should be easy to reach.
- Locate the main gas shut-off valve.
- Practice turning off the valve.
- Make sure everyone who uses the grill knows the procedure.
- Keep emergency contact numbers nearby.
Frequently Asked Questions
How Do I Safely Connect A Natural Gas Line To A Grill?
Turn off the main gas supply before starting. Use approved fittings and tools. Check for leaks with soapy water. If unsure, hire a licensed professional to ensure safety and compliance with local codes.
What Materials Are Needed For Gas Line Installation?
You’ll need a gas line, pipe fittings, a flexible connector, pipe thread sealant, and a wrench. Use materials rated for natural gas. Always follow manufacturer guidelines and local regulations for installation.
Can I Connect A Natural Gas Line Myself?
DIY connection is possible if you have plumbing experience. However, it’s safer to hire a licensed technician. Incorrect installation can cause leaks, hazards, and void warranties. Always prioritize safety.
How To Test For Gas Leaks After Connection?
Apply soapy water to all joints and connections. Turn on the gas slowly. Look for bubbles indicating leaks. If bubbles appear, turn off gas immediately and fix leaks before use.
Conclusion
Connecting a natural gas line to your built-in grill can be safe and simple. Always check for leaks before lighting the grill. Use the right tools and follow each step carefully. If unsure, ask a professional for help. Enjoy cooking with steady heat and save money on propane.
This setup brings convenience right to your backyard. Take your time and stay safe during installation. Your grill will be ready for many tasty meals ahead.