

Are you ready to turn raw meat into delicious homemade ground meat with ease? Learning how to assemble a meat grinder might seem tricky at first, but it’s simpler than you think.
When you know the right steps, you’ll save time, avoid frustration, and get perfect results every time. This guide will walk you through the process clearly and quickly, so you can focus on creating tasty meals without the hassle. Keep reading, and you’ll be grinding like a pro in no time!
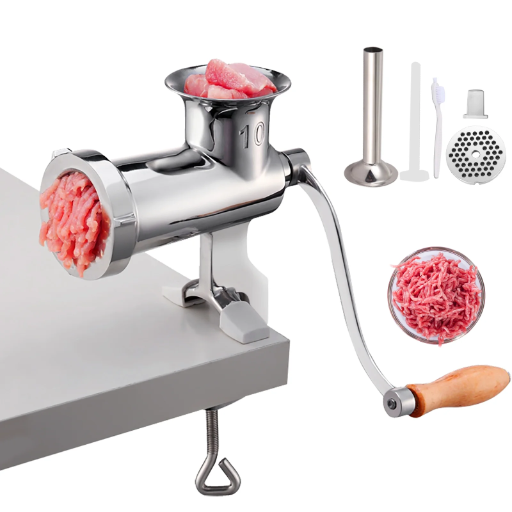
Credit: wholesale-appliances.com
Tools And Parts Needed
Essential tools include a screwdriver, wrench, and cleaning brush. These help to fit and clean parts easily. A sturdy surface is needed to place the grinder securely during assembly.
Identifying grinder components is key. The main parts are the feeding tray, hopper, auger, blade, and grinding plate. The auger pushes meat toward the blade. The blade cuts the meat into small pieces. The grinding plate controls the meat size.
| Component | Function |
|---|---|
| Feeding Tray | Holds meat before grinding |
| Hopper | Feeds meat into the auger |
| Auger | Pushes meat to blade |
| Blade | Cuts meat into pieces |
| Grinding Plate | Controls meat size |
Preparing The Workspace
Start by cleaning the workspace thoroughly. Remove any dust or dirt from surfaces. Keep tools and parts organized to avoid confusion. Arrange the grinder parts neatly within reach. This makes assembly easier and faster.
Check that the area is well lit. Good lighting helps you see small parts clearly. Use a clean cloth to wipe all parts before assembling. This ensures hygiene and better fitting.
- Wear gloves to protect hands from sharp edges.
- Keep children and pets away from the workspace.
- Unplug electrical devices nearby to prevent accidents.
- Read the meat grinder manual carefully before starting.
Following these safety steps prevents injuries and keeps the process smooth.
Assembling The Main Body
Attach the handle or motor firmly to the main body. Ensure the connection is tight to avoid slipping. The handle should turn smoothly without resistance. For electric models, plug in the motor securely before use.
Place the auger inside the main body, aligning it with the motor or handle shaft. The auger moves the meat toward the cutting blades. Make sure it fits snugly and rotates freely.
Secure the auger by fastening the retaining ring or screw. This keeps the parts in place during grinding. Check that everything is locked properly before starting the grinder.
Installing Grinding Plates And Blades
Choosing the right grinding plate depends on the type of meat and texture you want. Plates come with different hole sizes. Smaller holes give finer meat, while larger holes produce coarser meat. Using the correct plate ensures smooth grinding and better results.
Positioning the blade correctly is very important for safe and efficient grinding. The blade must face outward, with the sharp edges pointing toward the grinding plate. This setup allows the blade to cut meat properly as it moves through the plate. Always check that the blade is secure before assembly.
Attaching The Grinder Head
Start by placing the grinder head close to the motor unit. Ensure the shaft and grinder head holesare perfectly aligned. This alignment is key for smooth operation and safety.
Slide the grinder head onto the shaft carefully. Avoid forcing it to prevent damage.
- Check all components fit snugly.
- Look for any gaps or misalignment.
- Adjust the position until it fits properly.
Secure the grinder head with screws or locking rings. Use a screwdriver or hand tighten locks firmly. Do not overtighten to avoid stripping threads.
Double-check that all screws and locksare tight and secure. This ensures the grinder stays in place during use.
Testing The Assembly
After assembling the meat grinder, it is important to test its operation. Start by rotating the handle manually. This checks the smooth movementof the parts inside. If the handle moves freely without resistance, the assembly is correct.
Next, test the motor function if your grinder is electric. Plug it in and turn it on briefly. The motor should run smoothly without unusual sounds. A steady motormeans the internal parts are aligned properly. Stop the motor immediately if it makes loud noises or stops suddenly.
- Check the handle for smooth rotation.
- Ensure no parts feel stuck or tight.
- Run the motor briefly to check sound and speed.
- Turn off motor if it feels hot or noisy.
- Double-check all screws and locks are tight.
Maintenance Tips
Clean the meat grinder parts right after use. This stops meat bits from drying and spoiling. Take apart all removable pieces. Wash each with warm, soapy water. Use a brush to clean small holes and blades. Rinse well and dry completely to stop rust.
Lubricate metal parts lightly with food-safe oil. This keeps the grinder working smoothly and stops rust. Store the grinder in a dry place. Cover it to keep dust and dirt away. Proper care helps the grinder last longer and work better every time.

Credit: www.vevor.com

Credit: www.amazon.com
Frequently Asked Questions
How Do I Start Assembling A Meat Grinder?
Begin by identifying all parts and cleaning them. Attach the main body to the base securely. Insert the auger, followed by the blade, and then the grinding plate. Finally, secure the end ring tightly to hold everything in place.
What Tools Are Needed To Assemble A Meat Grinder?
Most meat grinders require no extra tools beyond the included parts. Some models may need a screwdriver to tighten screws. Always check the manual to confirm if tools are necessary. Using the right tools ensures safe and proper assembly.
How To Ensure The Meat Grinder Is Assembled Correctly?
Check that all parts fit snugly without gaps or looseness. The blade must be sharp and face the correct direction. Turn the handle to confirm smooth rotation. A properly assembled grinder prevents damage and ensures efficient grinding.
Can I Assemble A Meat Grinder Without Instructions?
It’s possible but not recommended to skip instructions. Manuals provide step-by-step guidance for safe assembly. Incorrect assembly can cause damage or injury. Always follow the manufacturer’s instructions for best results and safety.
Conclusion
Assembling a meat grinder is easier than it seems. Follow the steps carefully and take your time. Make sure all parts fit well and stay clean. Test the grinder before use to ensure it works properly. Regular maintenance keeps it running smoothly.
Enjoy fresh ground meat anytime you want. Simple tools and patience make the process smooth. Now, you can prepare your favorite recipes with confidence. Keep practicing, and it will become second nature.