
Is your grinder not cutting like it used to? Changing the blade might be all you need to get it working like new again.
But if you’ve never done it before, the idea can feel a bit tricky or even risky. Don’t worry—this guide will walk you through each step clearly and safely. By the time you finish reading, you’ll have the confidence to replace your grinder’s blade quickly and easily.
Ready to save time and money? Let’s get started!
Safety Precautions
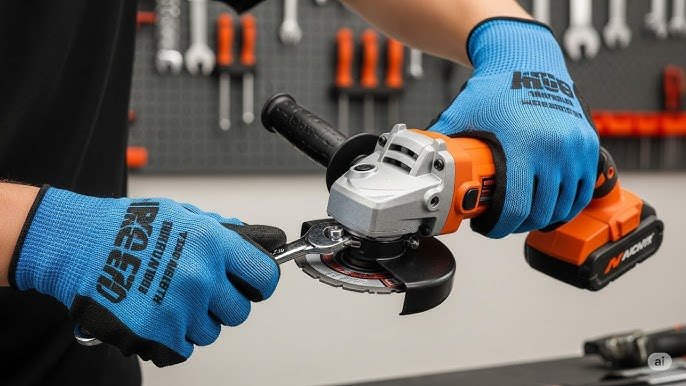
Wear protective gearlike gloves and safety glasses. This stops cuts and eye injuries. Always use a dust mask to avoid breathing dust particles.
Unplug the grinderbefore changing the blade. This prevents accidental start-ups that can cause serious harm.
Inspect the bladefor cracks or damage. A damaged blade can break during use, causing injury. Replace any blade that looks worn or bent.

Credit: www.youtube.com
Tools Needed
- A wrenchor spannerfits the grinder’s nut.
- A screwdriverhelps to remove safety guards or screws.
- A replacement blademust match your grinder model.
Use the wrench to loosen the blade nut carefully. The screwdriver removes screws holding covers. Always check the new blade for damage before fitting.
Removing The Old Blade
To lock the spindle, press the spindle lock button. This stops the blade from moving. Use a firm grip to hold it steady.
Next, loosen the blade nutby turning it with a wrench. Turn it in the direction opposite to the blade’s spin. This helps avoid damage.
Carefully take off the bladeonce the nut is loose. Pull the blade straight off. Be cautious; blades can be sharp.

Credit: www.youtube.com
Installing The New Blade
Position the new blade so the teeth face the right way. The blade must sit flat against the grinder’s flange.
Use the blade nut to hold the blade tightly in place. Turn the nut clockwise until it is secure but avoid overtightening.
Check the blade alignment by spinning the grinder slowly. The blade should not wobble or touch the guard. If it does, loosen the nut and adjust the blade position.
Testing The Grinder
Reconnect the power cord to the grinder securely. Make sure the switch is off before plugging in. This prevents accidents.
Perform a test run by turning on the grinder briefly. Watch the blade spin smoothly without wobbling.
Listen carefully for any unusual noises. Grinding, rattling, or squeaking sounds may indicate a problem.
If noises persist, stop the grinder immediately. Check the blade and mounting before using again.

Credit: m.youtube.com
Maintenance Tips
Cleaning the grinder often keeps it working well. Dust and metal bits can block parts. Use a brush or cloth to wipe it. Avoid water on electrical parts. Clean after every use for best results.
Store the grinder in a dry place. Moisture can cause rust and damage the tool. Keep it away from heavy objects that might fall on it. Use a case or box to protect it from dust and drops.
Replace blades when they get dull or chipped. Sharp blades cut better and safer. Using dull blades can strain the motor and cause accidents. Check the blade before each use. Change it if you see damage or less cutting power.
Frequently Asked Questions
How Do I Safely Remove A Grinder Blade?
First, unplug the grinder for safety. Use a wrench to loosen the blade nut. Turn it counterclockwise carefully. Remove the blade and clean the area before installing a new one.
What Tools Are Needed To Change A Grinder Blade?
You typically need a wrench or blade removal tool. Some grinders come with a lock button to hold the blade. Always check your grinder’s manual for specific tools required.
How Often Should I Replace My Grinder Blade?
Replace the blade when it becomes dull or damaged. Frequent use may require changing blades every few months. Inspect the blade regularly for safety and efficiency.
Can I Use Any Blade On My Grinder?
No, use blades compatible with your grinder’s size and type. Using incorrect blades can cause damage or accidents. Always check the blade specifications before purchasing.
Conclusion
Changing the blade on your grinder is simple and safe. Always unplug the tool before starting. Use the right tools to remove and install the blade. Check the blade’s condition often to know when to replace it. A sharp blade makes your work easier and safer.
Take your time and follow each step carefully. Practice will help you do it faster and better. Keep your grinder ready for any project by changing blades regularly. Safety first—always wear protective gear while working. Now, you can handle blade changes with confidence.