
Changing the blade on your grinder might seem tricky, but it doesn’t have to be. If your grinder isn’t cutting like it used to, a fresh blade can make all the difference.
In this guide, you’ll find simple, step-by-step instructions that anyone can follow. By the time you finish reading, you’ll feel confident handling your grinder safely and efficiently. Ready to get your tool working like new again? Let’s dive in.
Choosing The Right Blade
Different types of grinder bladesfit various tasks. Cutting blades slice through metal and wood. Grinding blades smooth rough surfaces. Diamond blades work best on tile and stone. Choosing the right blade improves cutting qualityand safety.
| Blade Type | Best For | Material |
|---|---|---|
| Cutting Blade | Metal, Wood | Steel |
| Grinding Blade | Smoothing surfaces | Abrasive materials |
| Diamond Blade | Tile, Stone | Diamond-coated |
Blade size matters. Most grinders use 4.5 to 7-inch blades. Smaller blades offer more control. Larger blades cut deeper but need care. Blade material affects strength and lifespan. Choose blades made from strong, durable materialsfor best results.

Credit: m.youtube.com
Gathering Necessary Tools
Safety gearis very important before changing a blade on a grinder. Wear protective glovesto keep hands safe from cuts and sharp edges. Use safety gogglesto protect eyes from flying debris. A dust maskhelps stop breathing in dust and particles. Ear protection reduces loud noise from the grinder.
For removing and installing the blade, gather these tools:
- Wrench or spannerto loosen and tighten the blade bolt
- Blade lock buttonto stop the blade from spinning
- New bladethat fits your grinder type and size
| Tool | Purpose |
|---|---|
| Protective gloves | Protect hands from cuts and sharp edges |
| Safety goggles | Protect eyes from flying sparks and debris |
| Dust mask | Prevent inhaling dust and particles |
| Wrench or spanner | Loosen and tighten the blade bolt |
| Blade lock button | Stop blade from spinning during change |
| New blade | Replace old or damaged blade |
Preparing The Grinder
First, unplug the grinderto ensure safety. This stops any accidental start. Always check that the power is off before handling the blade.
Place the grinder on a stable surface. This keeps it from moving while you work. Use a clamp or vise to secure the grinder. It prevents slipping and makes the blade change easier.
- Unplug the grinder from the power outlet.
- Check the plug and cord for damage.
- Place the grinder on a flat, steady surface.
- Use a clamp to hold the grinder firmly.
- Wear gloves to protect your hands.

Credit: www.youtube.com
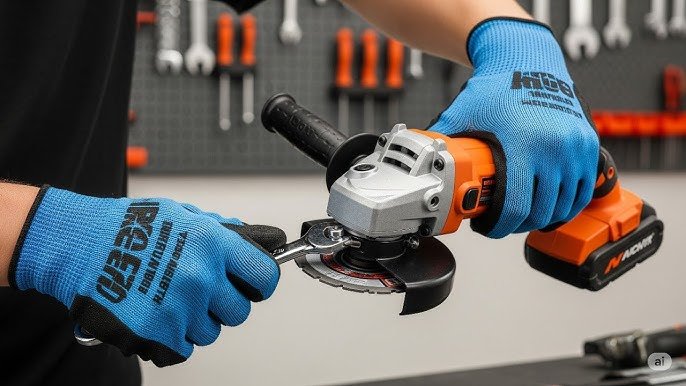
Removing The Old Blade
To lock the spindle, press the spindle lock button firmly. This stops the blade from moving. Hold the grinder steady to avoid slipping.
Use a wrench to loosen the blade nut. Turn it counterclockwise. Sometimes, the nut can be tight. Apply steady force without rushing.
- Press the spindle lock button fully.
- Hold the grinder securely.
- Use the correct size wrench.
- Turn the blade nut slowly to loosen.
- Remove the nut and old blade carefully.
Installing The New Blade
Place the new blade onto the grinder’s spindle carefully. The blade’s hole must fit securelyonto the spindle. Make sure the blade’s teeth point in the correct directionfor cutting. If the blade is not aligned properly, it can cause accidents or damage the tool.
Once aligned, hold the blade in place and start tightening the blade nut. Use a wrench or the tool’s key to secure the nut firmly. Do not over-tighten it, as this might damage the bladeor spindle. The nut should be tight enough to keep the blade from moving during use.

Credit: www.familyhandyman.com
Testing And Safety Checks
Before using the grinder, always check the blade’s tightness. A loose blade can cause accidents. Hold the grinder firmly and spin the blade by hand first. Make sure it moves smoothly without wobbling. If it feels loose or uneven, turn off and fix it again.
Wear safety goggles and glovesduring this check. Keep your hands clear of the blade’s path. Spin the blade gently to avoid any sudden moves.
Check the blade’s position on the grinder. The blade should sit flat and centeredon the flange. The locking nut must be tight but not over-tightened. This keeps the blade secure and balanced during use.
- Blade should not wobble.
- Locking nut must be firm.
- Blade must be clean and free from cracks.
Tips For Faster Blade Changes
Keep your workspace neat and tools close. This saves time and avoids frustration. Lay out the grinder, new blade, wrench, and safety gear before starting.
Clean the area to prevent dirt from entering the grinder parts. Use a tray or mat to catch small screws and washers. Good lighting helps you see better and work faster.
- Arrange tools in order of use
- Clear away clutter and dust
- Use a magnetic tray for small parts
- Check lighting before starting
Regular maintenance keeps the grinder ready and safe. Check the blade and parts often for wear or damage. Tighten screws and clean the grinder after each use.
Lubricate moving parts to prevent rust and make blade changes easier. Replace worn parts quickly to avoid bigger problems. A well-kept grinder makes blade changes faster and safer.
Frequently Asked Questions
How Do I Know When To Change A Grinder Blade?
Change your grinder blade when it becomes dull or inefficient. Signs include difficulty cutting, increased vibration, or visible wear. Regularly inspect your blade for chips or cracks to ensure safety. Replacing the blade timely enhances performance and extends the life of your grinder.
What Tools Are Needed To Change A Grinder Blade?
To change a grinder blade, you’ll need a wrench or spanner. This tool helps loosen the locking nut. Some grinders come with a special tool for this purpose. Always ensure your grinder is unplugged before starting. Safety gloves are recommended to protect your hands during the process.
How Long Does It Take To Change A Blade?
Changing a grinder blade typically takes about 5 to 10 minutes. This includes unplugging the grinder, loosening the locking nut, and replacing the blade. With practice, the process becomes quicker. Always ensure safety measures are followed to prevent accidents during blade replacement.
Can I Use Any Blade For My Grinder?
Not all blades fit every grinder model. It’s crucial to select a blade compatible with your grinder. Check the manufacturer’s specifications for blade size and type. Using the wrong blade can result in poor performance or safety hazards. Always prioritize compatibility and quality when choosing a blade.
Conclusion
Changing a blade on a grinder is simple with the right steps. Always unplug the tool before starting for safety. Use the correct wrench to loosen and remove the old blade. Fit the new blade carefully and tighten it well.
Check the blade spins freely before use. Regular blade changes keep your grinder working well. Stay safe and take your time. Now, you can handle this task with confidence.